Textbook of Basic Laboratory Works on Life Science
セクションアウトライン
-
Experiments require techniques to accurately weigh the required amount of reagents and solutions or to dispense them quickly. Here we will learn how to use measuring pipette (1 mL) and micropipettes (10, 20, 200 and 1000 mL), which are commonly used in biochemistry and molecular biology experiments.
(1) Measuring pipet
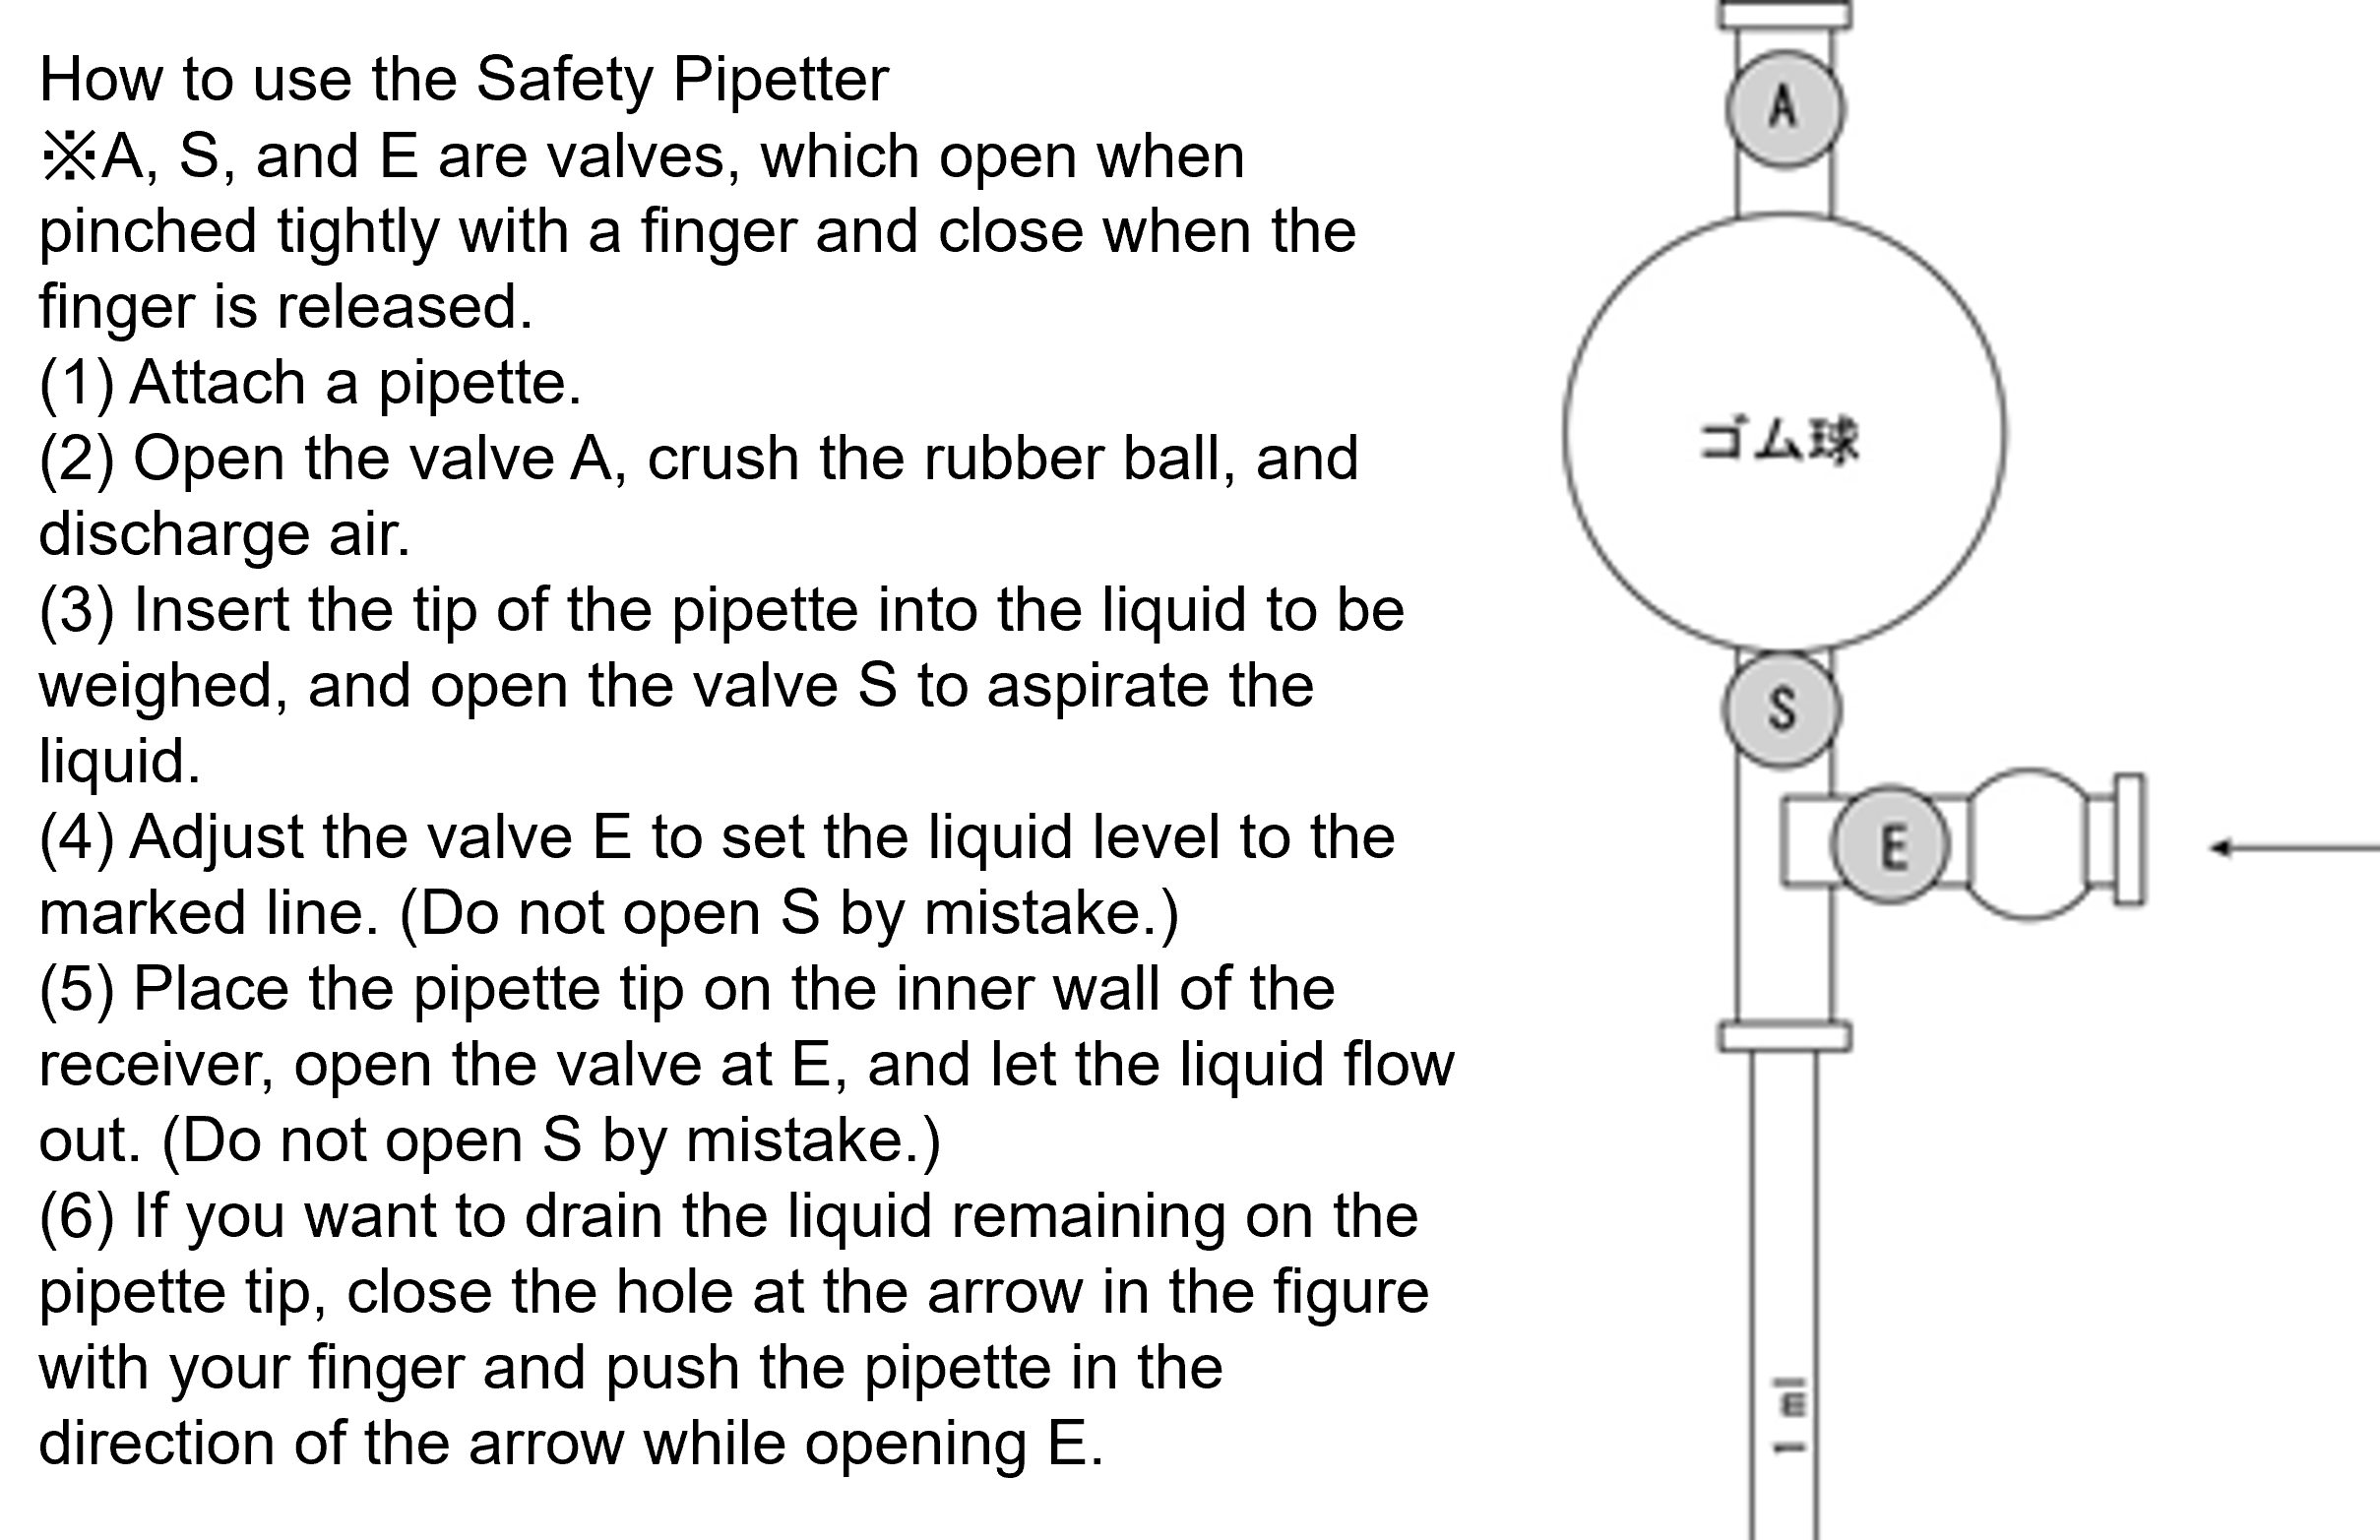
Different from a hole pipette, an arbitrary volume of liquid can be weighed into a glass tube with a narrow tip and graduated structure, but the accuracy is inferior to that of a hole pipette. It is convenient to use it when dispensing a liquid continuously into a plurality of containers in a predetermined volume, or the like. There are a "tip graduation type" with a graduation to the tip and a "middle graduation type" with no graduation at the tip (figure below). However, the latter cannot be used in a way of exhaling the whole amount of the sucked-up. Aspirate with the mouth and regulate the outflow of liquid with the index finger. When handling liquids harmful to the human body or culture fluid of microorganisms, etc., use a safety pipettor or an electric pipettor.
In order to accurately weigh the volume, the tip of the pipette must be kept in contact with the inner wall of the container while the liquid is aligned with the mark or while the liquid is flowing out to the receiver. Also, do not use a pipette with a chipped tip.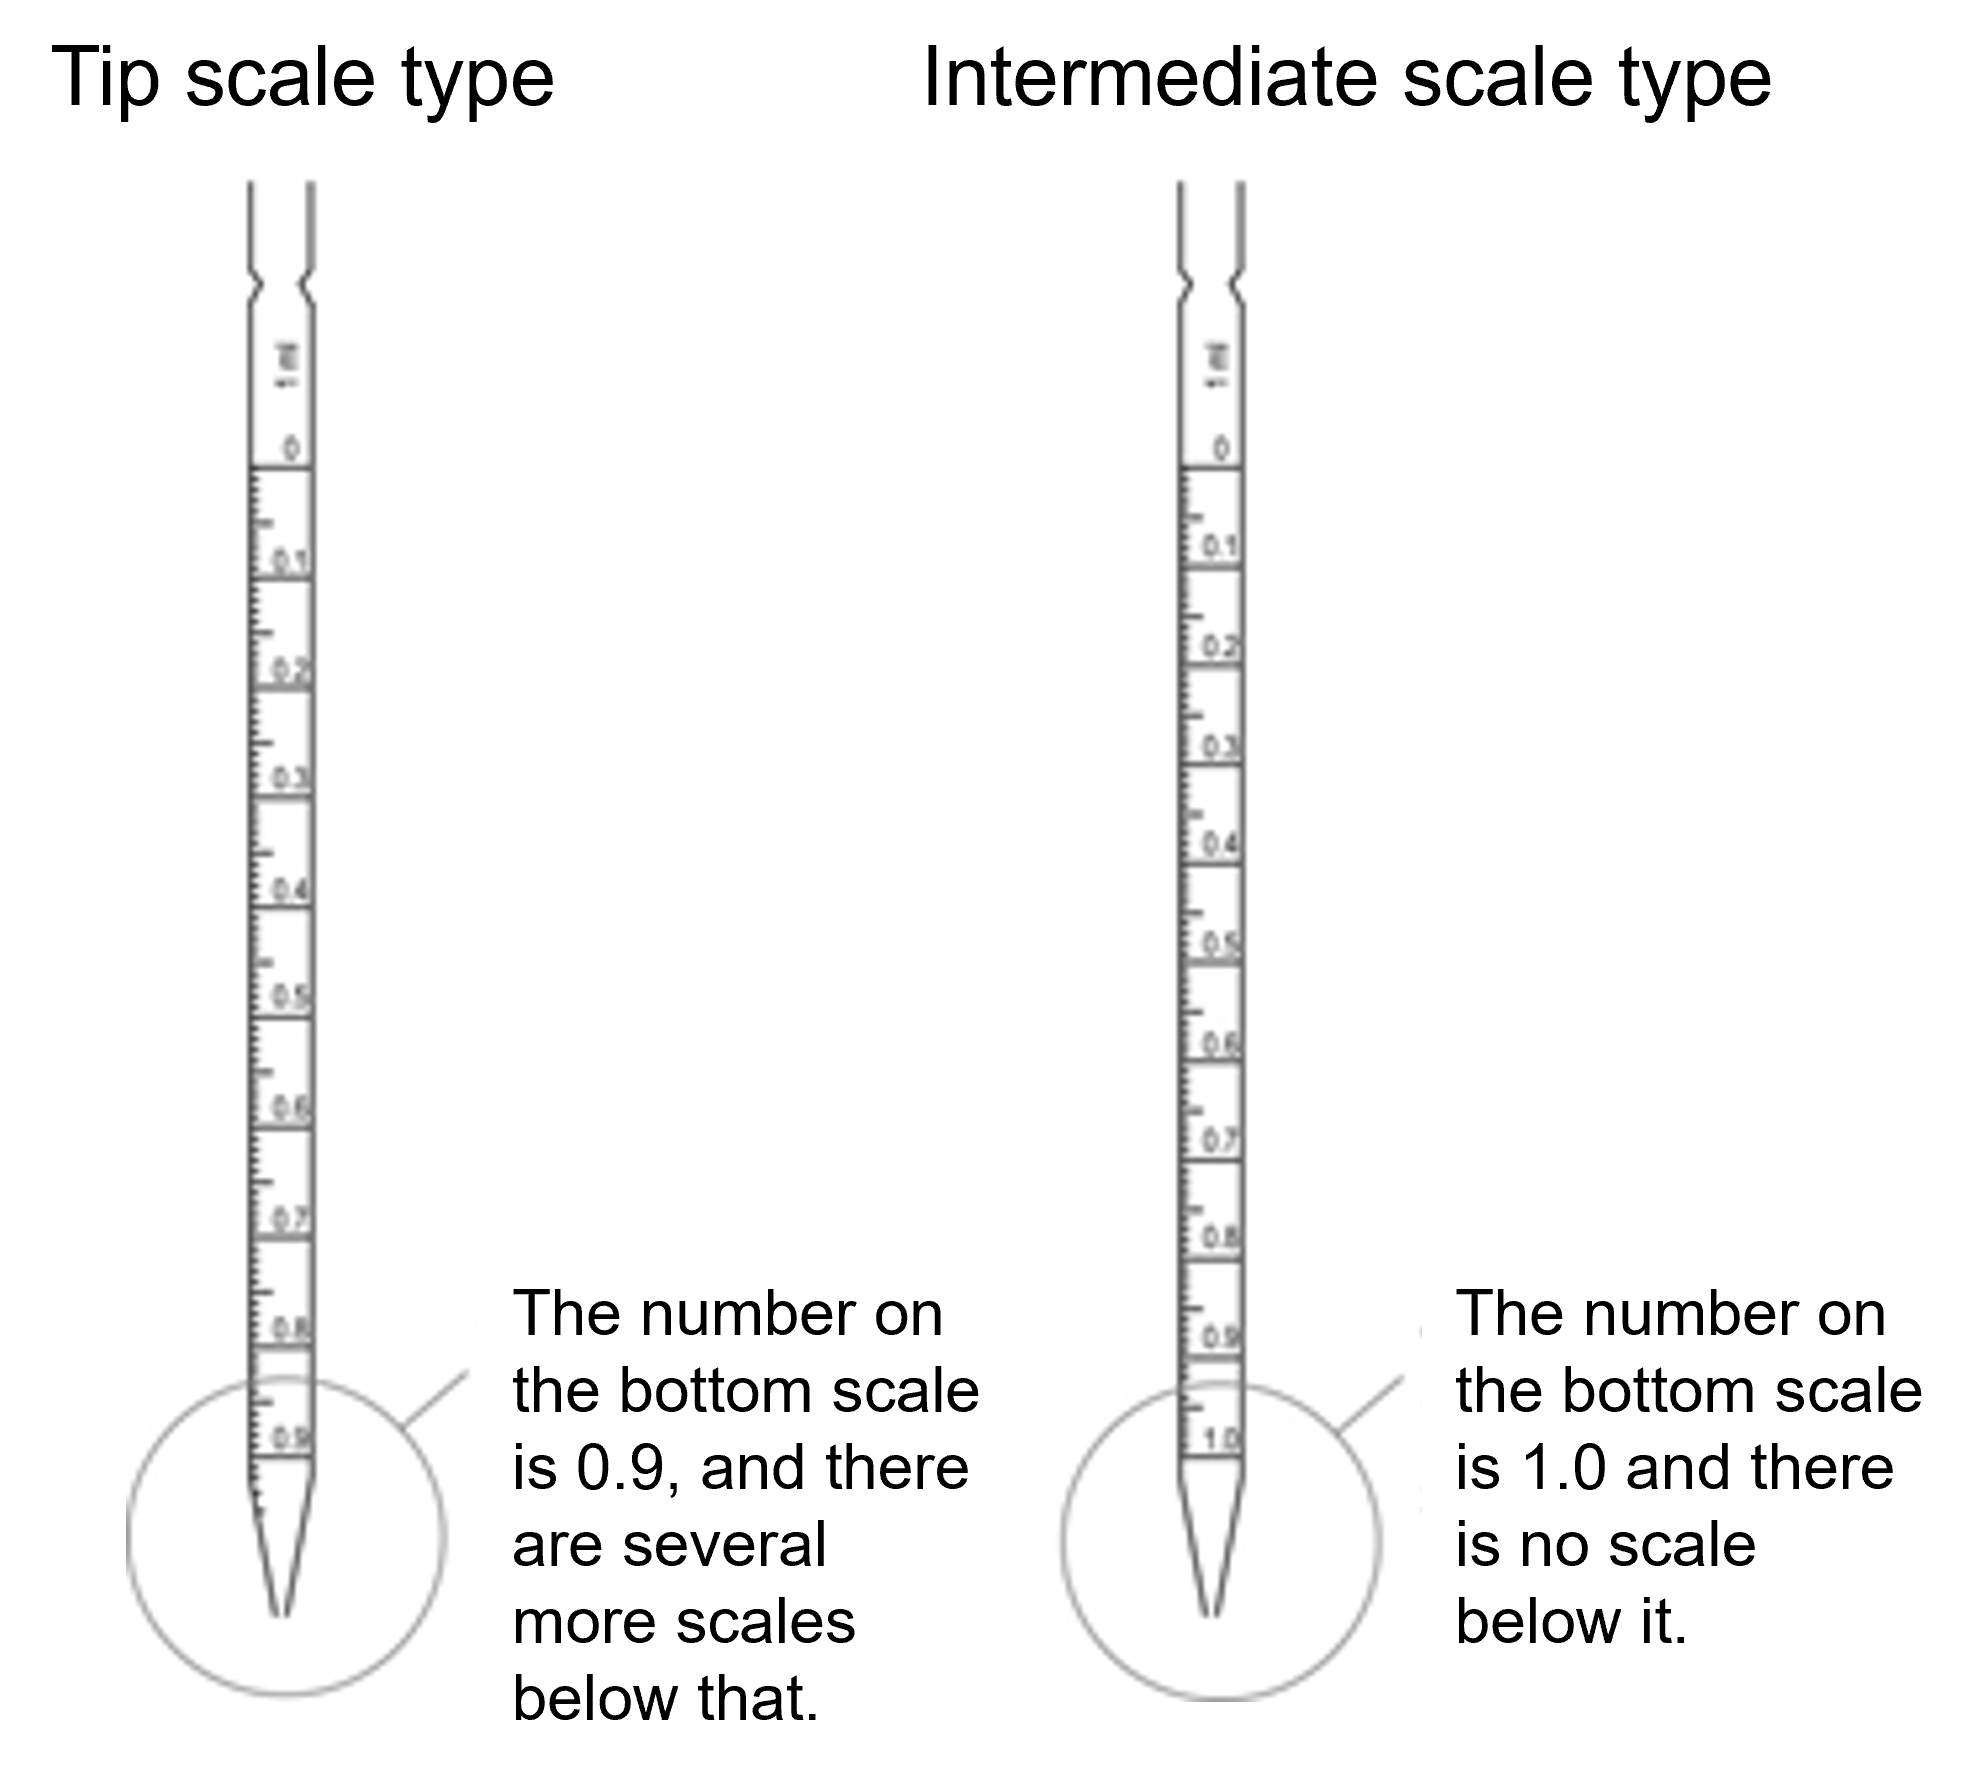
How to handle female pipettes (video)
[Experiment 1] Test for female pipette (10 mL)
(a) Place a 50-mL plastic tube on the weighing pan of the electronic balance as a receiver, and press TARE to clear the display to zero.
(b) The receiver is removed from the weighing pan, and the purified water is placed on the weighing pan with a volumetric pipette to a 1.00 mL receiver. The weight of the weighed water is read and recorded.
(c) (a) Perform the procedure (b) three times in total to obtain the average value.
(d) Similar measurements shall be made for 5.00 mL and 10.00 mL.
(e) The nominal error of the measuring pipette (10 mL) is generally ±0.1 mL. Make sure that the measurement results are within this error range. Also, consider whether or not there is a tendency for the error to change depending on the volume taken, if any.
Using the Electronic Balance (Video)(2) Micropipette
Here, a mechanical pipette capable of weighing a liquid of about 0.1 mL to 1 mL is referred to. There are pistons and cylinders inside, and any volume of liquid can be taken up by precisely adjusting the range of movement of the piston. The tip is fitted with a disposable nozzle called a pipette tip. Because very small amounts of liquid can be handled accurately and without waste, it is frequently used in molecular biology and biochemistry experiments. However, improper use easily deteriorates the internal parts and results in large errors. It is necessary to pay attention, because the appearance is normal even in such a condition. Further, since the portion above the pipette tip is repeatedly used without washing, contamination of the sample and the reagent tends to occur through this portion, and careful attention is required.
※ Do not contact the portion above the pipette tip with the container.
※ Never wick liquid above the pipette tip.
※ Do not point the tip upward.
The micropipettes are made of resin or metal. They should not be used in the handling of organic solvents, volatile strong acids, strong bases, etc., which evaporate vapors that corrode these components.
Micropipette Description (Video)
How to operate the micropipette (Movie)[How to handle] Failure to observe the underlined areas below will result in fluid being drawn into the unit.
(a) Capacity Settings
Turn the dial to set the desired volume. To increase the capacity, turn the scale slightly beyond it, and then adjust it to the desired scale. When reducing the volume, adjust directly to the scale. Never attempt to turn the dial beyond the settable range (0 mL or less or larger than the maximum capacity), as it will break.
(b) Firmly attach the pipette tip.
(c) The plunger (piston) can be pushed in two stages (Fig. 3) and operated with the thumb. a With the tip pushed into → b (never push into c at this time), insert the tip of the tip into the fluid to be weighed (about 1 to 3 mm in depth; Fig. 4-①).
(d) Decrease the force to hold the plunger. Slowly return to → a (critical!) with the force of the spring to draw the set volume into the tip (Fig. 4-②).
(e) The tip of the tip is brought into contact with the inner wall of the receiver, and the plunger is slowly pushed into the a → b (particularly for highly viscous liquids) to discharge the liquid (Fig. 4-③④).
(f) The liquid remaining at the tip of the pipette tip is drained by pushing the plunger further to c (Fig. 4-⑤). After draining, weaken the force to hold the plunger and slowly return it to the position a. At this time, the tip of the tip must be above the liquid level of the liquid in the receiver.
(g) On top of the pipette tip disposal container, press the eject button to remove the tip. (Fig. 4-⑥)Examples of operations that must not be performed (movies)[Experiment 2] Micropipette test
(a) Perform the test on 10 mL, 20 mL, 200 mL, and 1000 mL micropipettes as described in [Experiment 1]. Record the production number of the micropipette in the assay. For 10 mL and 20 mL micropipettes, use a 0.2 mL microtest tube as the receiver and an electronic balance that can measure up to 0.1 mg. For a 200 mL micropipette, use a 1.5 mL microtest tube as the receiver. In each case, close the lid when weighing. Measure the set capacity three times for each volume as shown below, and calculate the average value.
Group A: 10 mL micropipette: 1.0, 5.0, 10.0 mLGroup B: 20 mL micropipette: 2.0, 10, 20.0 mL
Group A: 200 mL micropipette: 20, 100, 200 mL
Group B: 1000 mL micropipette: 100, 500, 1000 mL
(b) The following are the nominal errors of the micropipettes used in this experiment. Check that the measurement results of the team are within the nominal error range.
Disassembly and assembly of micropipette (reference)
-
(1) Different methods for preparing solutions
It is necessary that solutions of a predetermined composition can be prepared with good reproducibility. The accuracy of the required concentration varies depending on the intended use. The following four methods are commonly used to represent concentrations:
Weight percent concentration ○% (w/w), ○%wt
"How many grams of solute is dissolved in 100 g of solution"
Example) 10% (w/w) aqueous sodium hydroxide solution
〇 Measure out 10 g of sodium hydroxide on a balance and dissolve it in 90 g of water (if the specific gravity is set to 1, measure 90mL with a graduated cylinder).
×Measure out 10 g of sodium hydroxide on a x-balance and dissolve in 100 mL of water. → 10 ○ (10 + 100) × 100 = 9.09% (w/w) of the solution.
Weight percent concentration 〇% (w/v)
"How many grams of solute is dissolved in 100 mL of solution"
Example) 5% (w/v) aqueous sodium chloride solution
〇 Measure out 5 g of sodium chloride on a balance, dissolve it in a small amount of water with a beaker, transfer it to a volumetric flask of 100 mL capacity, and make up to 100 mL with water.
△Measure out 5 g of sodium chloride on a balance and dissolve in 100 mL of water. → It is not considered that the volume increases by adding solutes.
Volume percent concentration 〇% (v/v)
"How much solute is dissolved in 100 mL of solution"
Example) 20% (v/v) ethanol
〇 Measure out 20 mL of ethanol in a measuring cylinder, place this into a 100 mL volumetric flask, and add water to make up to 100 mL.
×To each of the x 2 graduated cylinders, take 20 mL of ethanol and 80 mL of water, pour into a beaker, and mix. → Not a 100 mL solution.
Molar concentration M, ○ mol/L
"How many moles of solute is dissolved in 1 L of solution"
Example) 0.5 M sodium chloride
〇 Sodium Chloride (NaCl: Formula 58.44) 0. 5 mol (0.5 x 58.44 = 29.22 g) is weighed and transferred to a beaker to dissolve by adding water. This is scaled up to 1 L in a 1 L volumetric flask.
※ Dilution of the solution (for weight percent, volume percent, molarity
The concentration is one-half of x. → Double the volume by x with solvent.
Example) Dilute 0.0 5 M NaCl to 0.01 M NaCl.
〇 The concentration is 1/50. → 0. Transfer 10 ml of the 5 M NaCl to a 500 ml volumetric flask and scalpel up with water (50 times the volume).
〇 0.Mix 10 ml of 5 M NaCl solution with 490 ml of water measured in a graduated cylinder.
(2) Principle of buffering
Buffers are solutions that have the property of keeping pH constant and are often used in all biological and biochemical experiments, including the treatment of biological tissues, cell culture, enzymatic reactions, and analysis of biological components. A buffer is created by creating a state in which a weak acid and its conjugate base, or a weak base and its conjugate acid, coexist in solution. For example, in Tris-HCl buffer, Tris (abbreviation for tris-hydroxymethylaminomethane) is a weak base, and the cation formed by it accepting a proton (H+) is a conjugate acid. When an acid enters from the outside when these coexist in the solution, the reaction of Formula 1 proceeds in a right direction, thereby suppressing an increase in the concentration of hydrogen ions. On the other hand, when a base enters from outside, the reaction of Formula 1 proceeds leftward to neutralize the base.
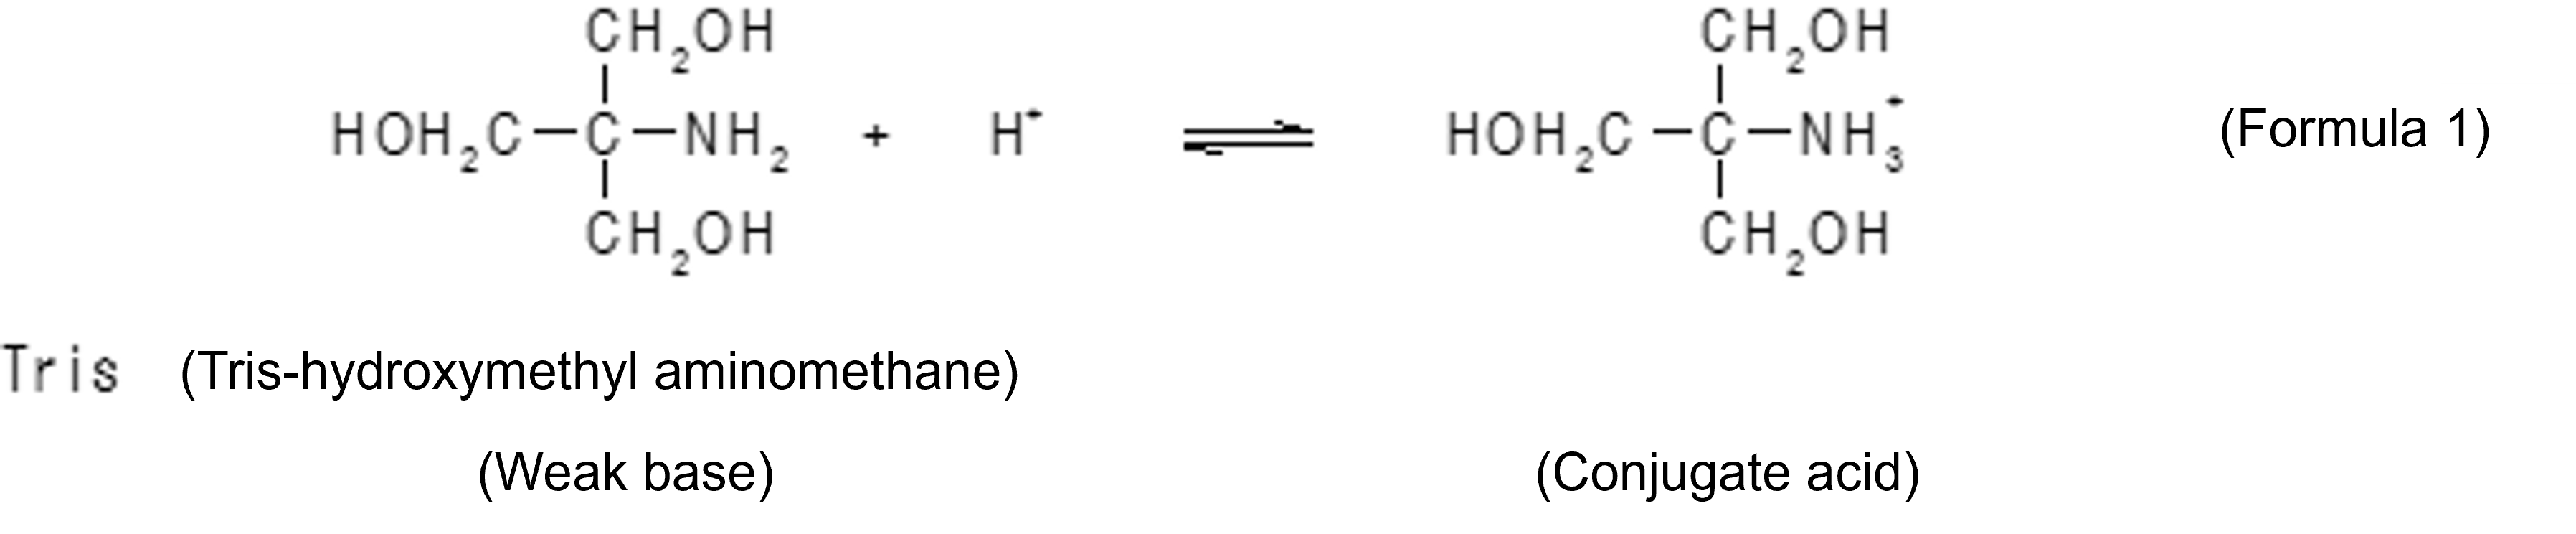
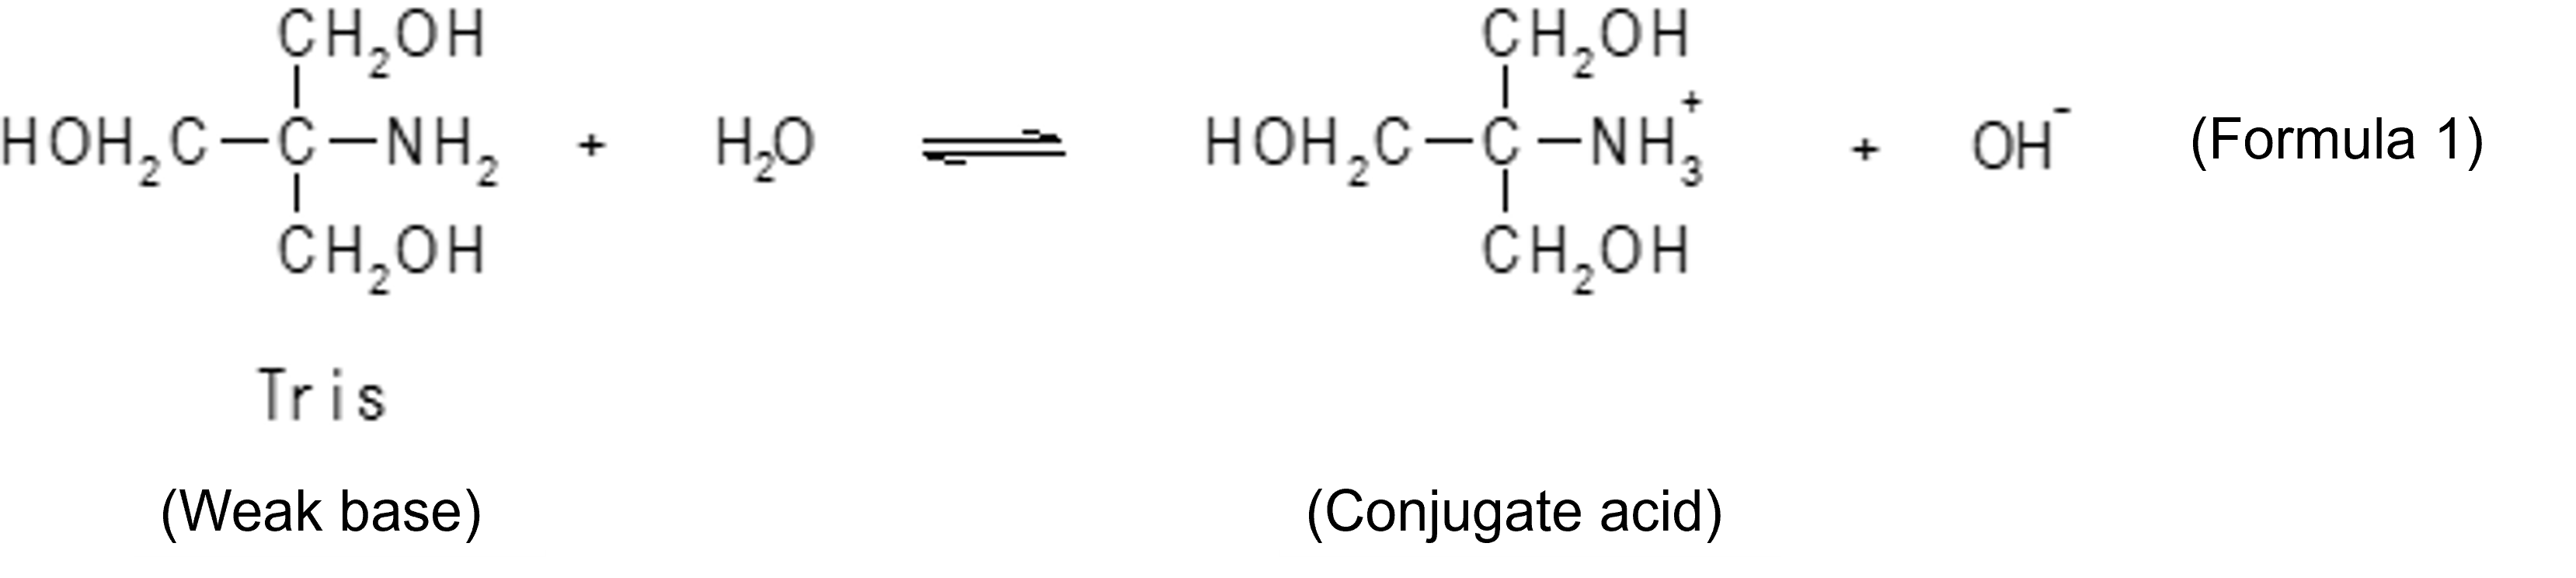
Simply, when tris is used as an aqueous solution, the reaction of Formula 2 takes place to form a state in which tris and its conjugate acid are coexisted, resulting in [Tris] > > [conjugate acid] (where [] means molarity), and there is a buffering action on the acid, but little buffering action on the base. It is when [Tris] = [conjugate acid] that the buffering action on both acid and base is maximized. To create such a state, a buffer is prepared here by adding to an aqueous Tris solution a molar amount of hydrochloric acid of about half of that amount.
[Experiment 3-1] Preparation of 0. 5 M Tris-HCl (pH 7.5)
Buffers prepared with Tris and hydrochloric acid have the property of keeping the pH at 7.5. The sum of the levels of Tris and its conjugate acids is 0.5 M. Prepare 100 mL.
(a) When the volume is 100 mL by dissolving in water, a Tris weighing 0.5 M is taken up in a medicine wrapper by an electronic balance (the molecular weight of the Tris is 121.14)
Using the Electronic Balance (Video)
(b) Transfer all the Tris on the medicine wrapper to a 100 mL beaker (any Tris remaining on the medicine wrapper should be sprayed with pure water from the wash bin and dropped into the beaker).
(c) Add pure water so that it does not exceed 100 mL, and stir with a glass rod to dissolve.
(d) Prepare the pHmeter (calibration is performed in pH 6 86 and 9.18 reference buffers).
(e) Measure the pH of the solution (indicating basic) while stirring with a magnetic stirrer.
(f) Add a few drops of 6 M HCl (care to handle) by Komagome pipette, and adjust the pH to 7.5.
(g) Transfer all the solutions to a 100 mL volumetric flask.
(h) Tight up to 100 mL with purified water in a washing bin, stopper, and stir.
(i) Transfer the contents to an Erlenmeyer flask, seal and store in the fridge.
[Experiment 3-2] 0.5 M Preparation of sodium phosphate buffer solution (pH 7.0)
The coexistence of H2PO4-(weak acid) and HPO42-(conjugate base) in the solutions shows buffering action.
(a) When dissolved in water to make a volume of 100 mL, 0.5 M of sodium dihydrogen phosphate (NaH2PO4, Formula 119.98) is taken up in an electronic wrapper.
(b) Transfer all sodium dihydrogen phosphate on the wrapper to a 100 mL beaker.
(c) Add pure water so that it does not exceed 100 mL, and stir with a glass rod to dissolve.
(d) Prepare the pHmeter (calibration is performed in pH 6 86 and 9.18 reference buffers).
(e) Measure the pH of the solution (indicating acidity) while stirring with a magnetic stirrer.
(f) Add a few drops of 4 M NaOH (care to handle) by Komagome pipette, and adjust the pH to 7.0.
(g) Transfer all the solutions to a 100 mL volumetric flask.
(h) Tight up to 100 mL with purified water in a washing bin, stopper, and stir.(i) Transfer the contents to an Erlenmeyer flask, seal and store in the fridge.
[Experiment 4] Measurement of buffer action of buffer
Prepared Tris-HCl (pH 7.5) Buffer and sodium phosphate buffer (pH 7.0) are added dropwise with hydrochloric acid or sodium hydroxide solution to observe the change in pHAs a blank test, perform the same procedure for pure water, and compare the results.
(a) 0.5 Dilute the buffer solution of M with pure water to prepare 100 mL of 20 mM buffer solution (transfer 4.0 mL to a volumetric flask with a volumetric pipette, add pure water, and make up to 100 mL).
(b) Among the diluted buffers, weigh 80 mL into the beaker with a graduated cylinder.
(c) Calibrate the pH meter.
(d) Measure the pH while stirring with a magnetic stirrer (make sure it doesn't change much from before dilution).
(e) 0. Add 1.0 mL of 1 M HCl with a female pipette and read the pH. If more than 1 mL is added, record the volume added.
(f) Repeat step (e) until a total of 10 mL is added.
(g) Freshly prepare 100 mL of 20 mM buffer solution and perform a determination in which 0. 1 M NaOH is added instead of HCl. (Repeat steps (a) to (f)).
(h) A graph is generated in which the volumes of HCl or NaOH added to the pH, abscissa, are taken on the vertical axis (Fig. 5).
(i) For the measurement, 80 mL of pure water is also used as a control experiment.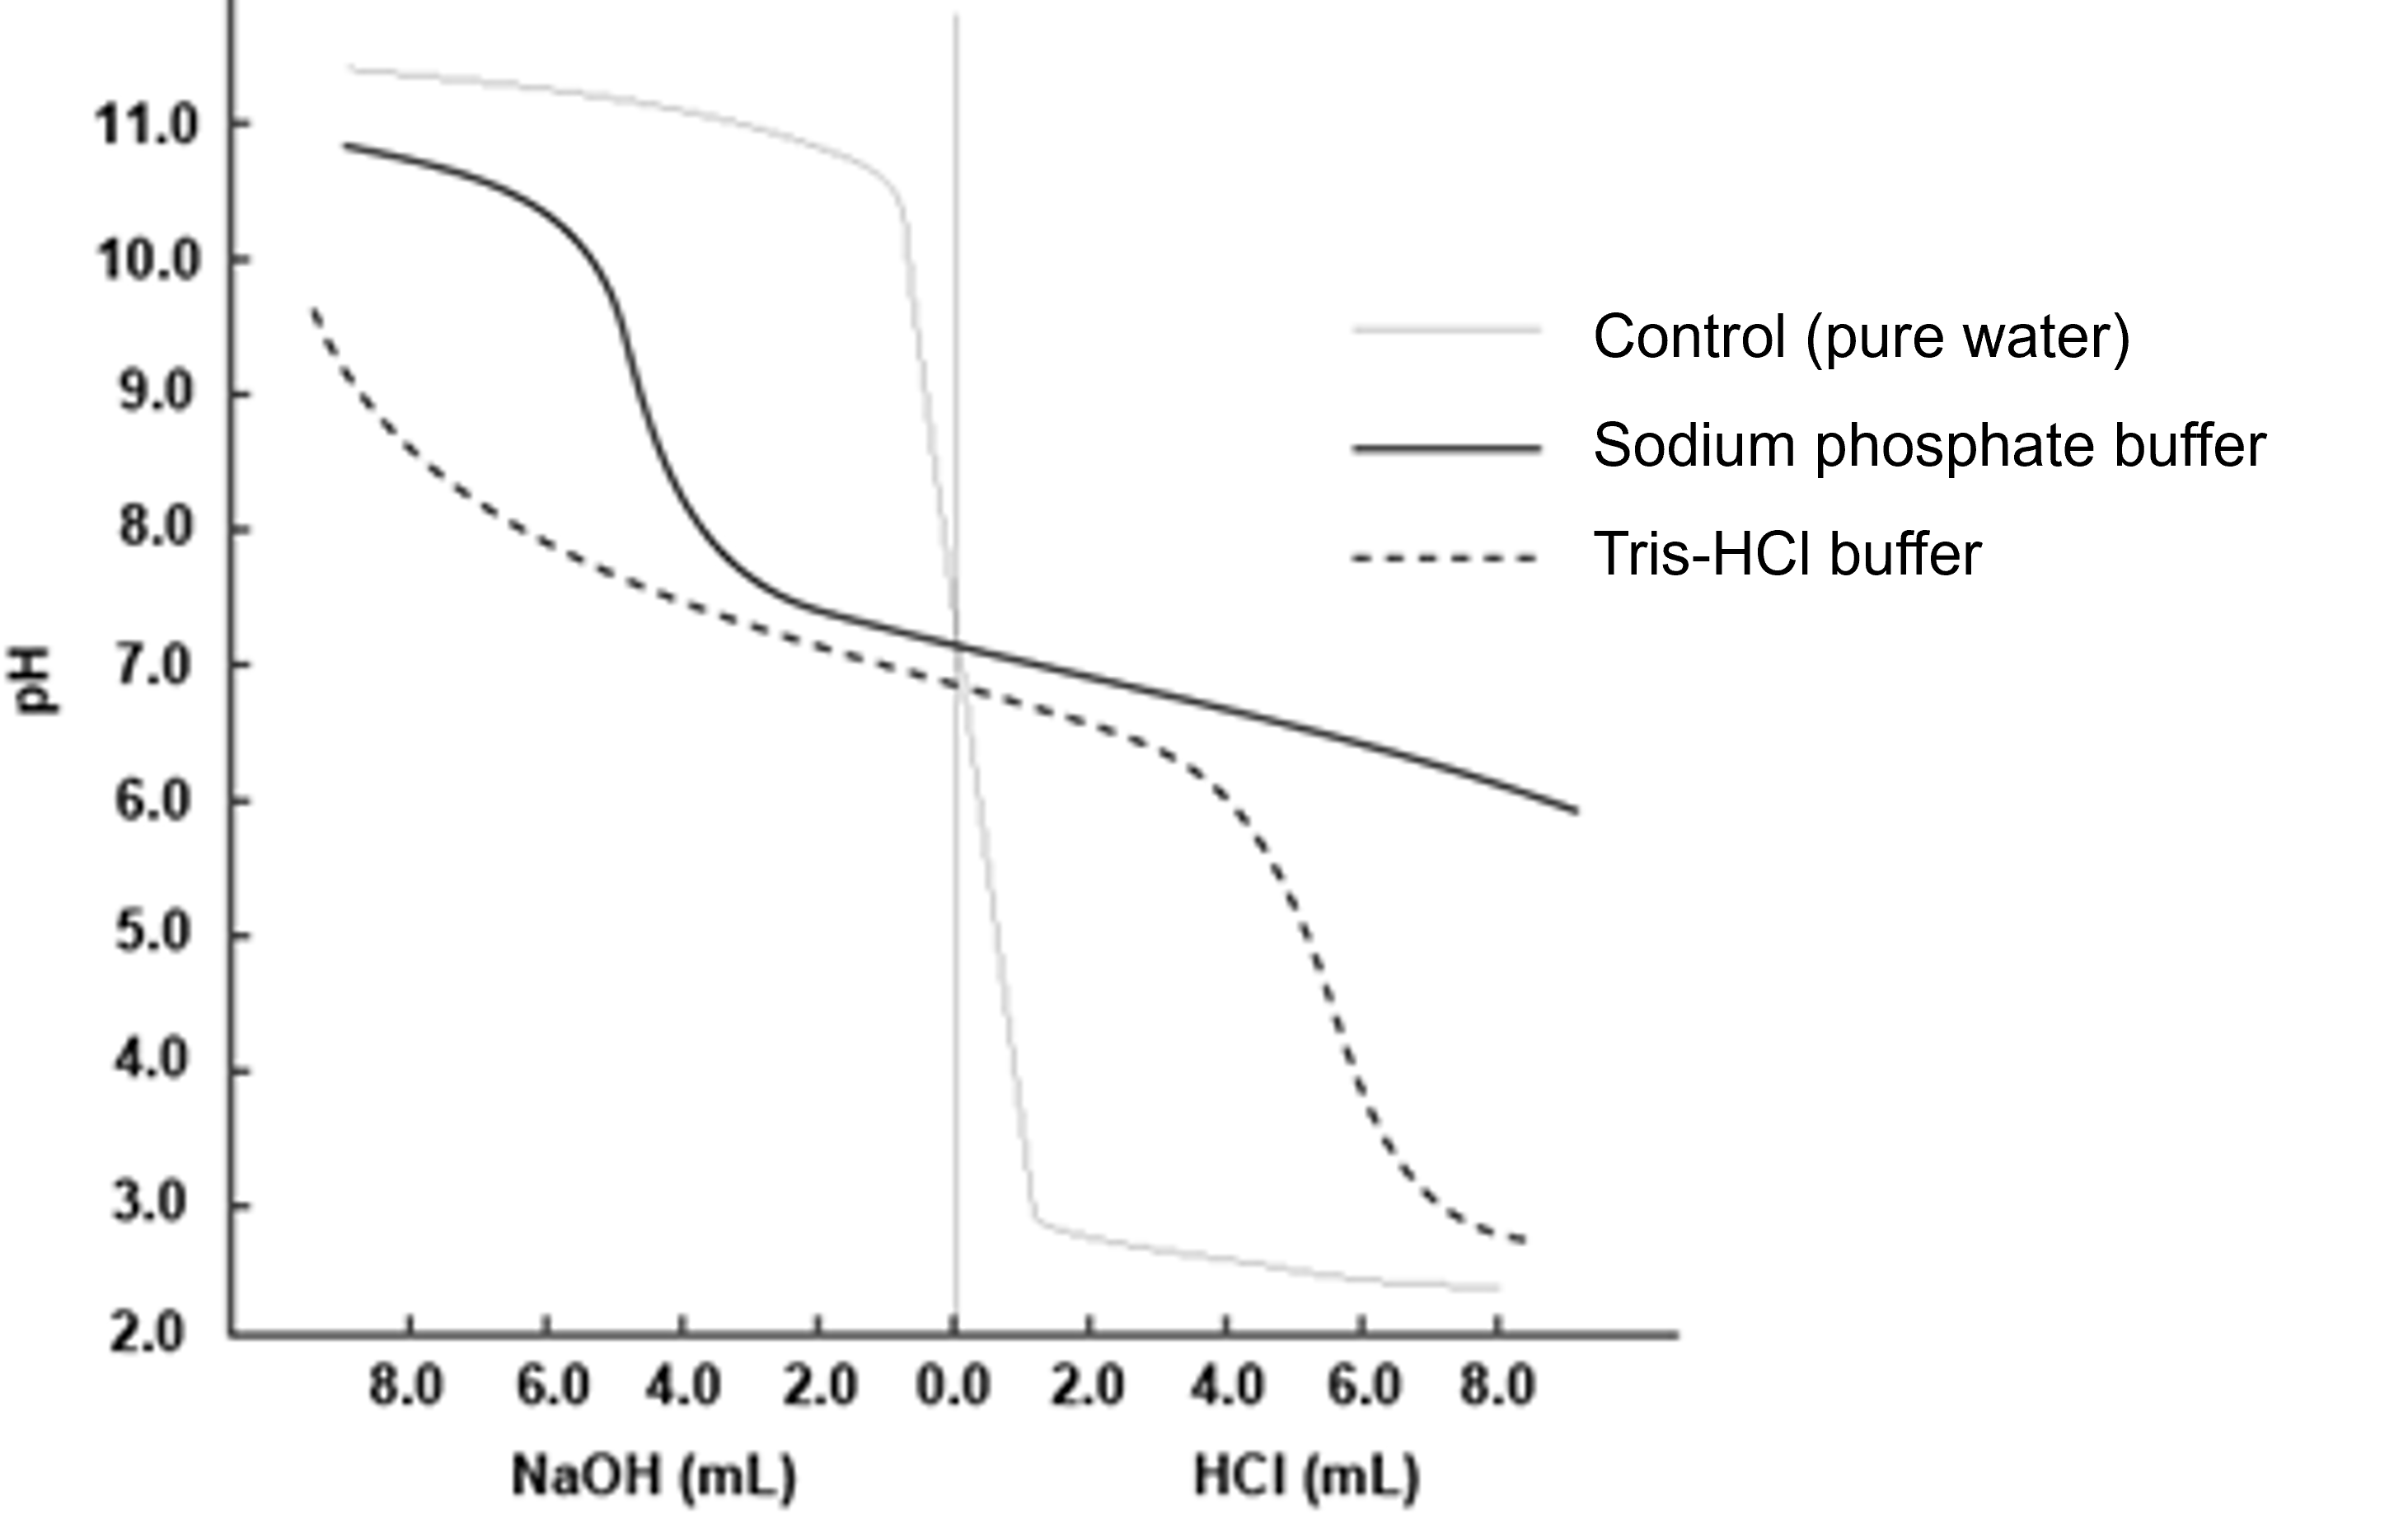
Figure 5 Example of Titration Curve
※ The range of pH at which buffering action is effective varies depending on the buffer component. Therefore, it is necessary to select a buffer component according to the target pH.
(Example)
Tris:pH 7~9
Dihydrogen phosphate: pH 6 to 8
Acetate:pH 4~5.5
Borate: pH 8 5 to 9.5
※ The pH does not change much when the buffer is diluted, but the higher the concentration of the buffer component, the greater the buffer capacity. Therefore, the buffering capacity is much greater at 0. 5 M Tris-HCl than at 20 mM Tris-HCl.
※ In biological and biochemical experiments, additional ingredients are often used in the buffer. The following examples are given (it is necessary to pay attention because the composition and pH are somewhat different depending on the experimenter).
○PBS (phosphate buffered saline)
150 mM NaCl, 10 mM NaH2PO4 (pH 7.4)
A buffer solution containing dihydrogen phosphate as a weak acid and hydrogen phosphate as a conjugate base. To bring the ionic strength (osmotic pressure) close to physiological conditions, NaCl is added. Used to wash or harvest cells.
○TE buffer
10 mM Tris-HCl (pH 8.0), 1 mM EDTA
It is often used as a solvent for DNA. EDTA acts to deactivate divalent metal ions from DNA degrading enzymes, preventing DNA degradation.
[Issue]
The equilibrium constant of Equation 1 is:
K1 = 2.0×10⁸
In addition, the equilibrium constant of Equation 3 is obtained.
K3 = 6.2×10⁻⁸
Determine the pH at which each buffer exhibits the highest buffering capacity, and show it on the titration curve generated by each buffer.
-
Although various methods exist for quantifying biological components, colorimetric methods are widely used because of their simplicity. Here, the biuret method and the Lowry method, which are colorimetric assays of proteins, are carried out, and the basic manipulation is mastered.
A measure representing the degree to which a solution absorbs light is called absorbance and is represented by the following formula:
A =-log (I/I0) = e × c × l (Formula 4)
A: Absorbance e: Molar absorptivity
I0: Intensity of light incident on solution c: Molar concentration of solution
I: Intensity of light transmitted through the solution l: Optical path length of the solution (distance of the portion that absorbs light)
I/I0: Transparency (T)
This is called Lambert-Beer's law. This law implies that the absorbance is proportional to the concentration. The absorbance is measured for several standard solutions of known concentration in advance, and it is shown that the concentration of a sample of unknown concentration can be determined from the absorbance, if e is obtained. For a particular wavelength of light, an instrument that measures absorbance is a spectrophotometer.
The biuret method is widely used for the determination of proteins. This method utilizes the coordination of nitrogen atoms involved in peptide bonds to Cu2+ under strongly basic conditions to form a reddish-purple dye. Peptides or proteins with three or more amino acids have a certain color development rate regardless of the type.
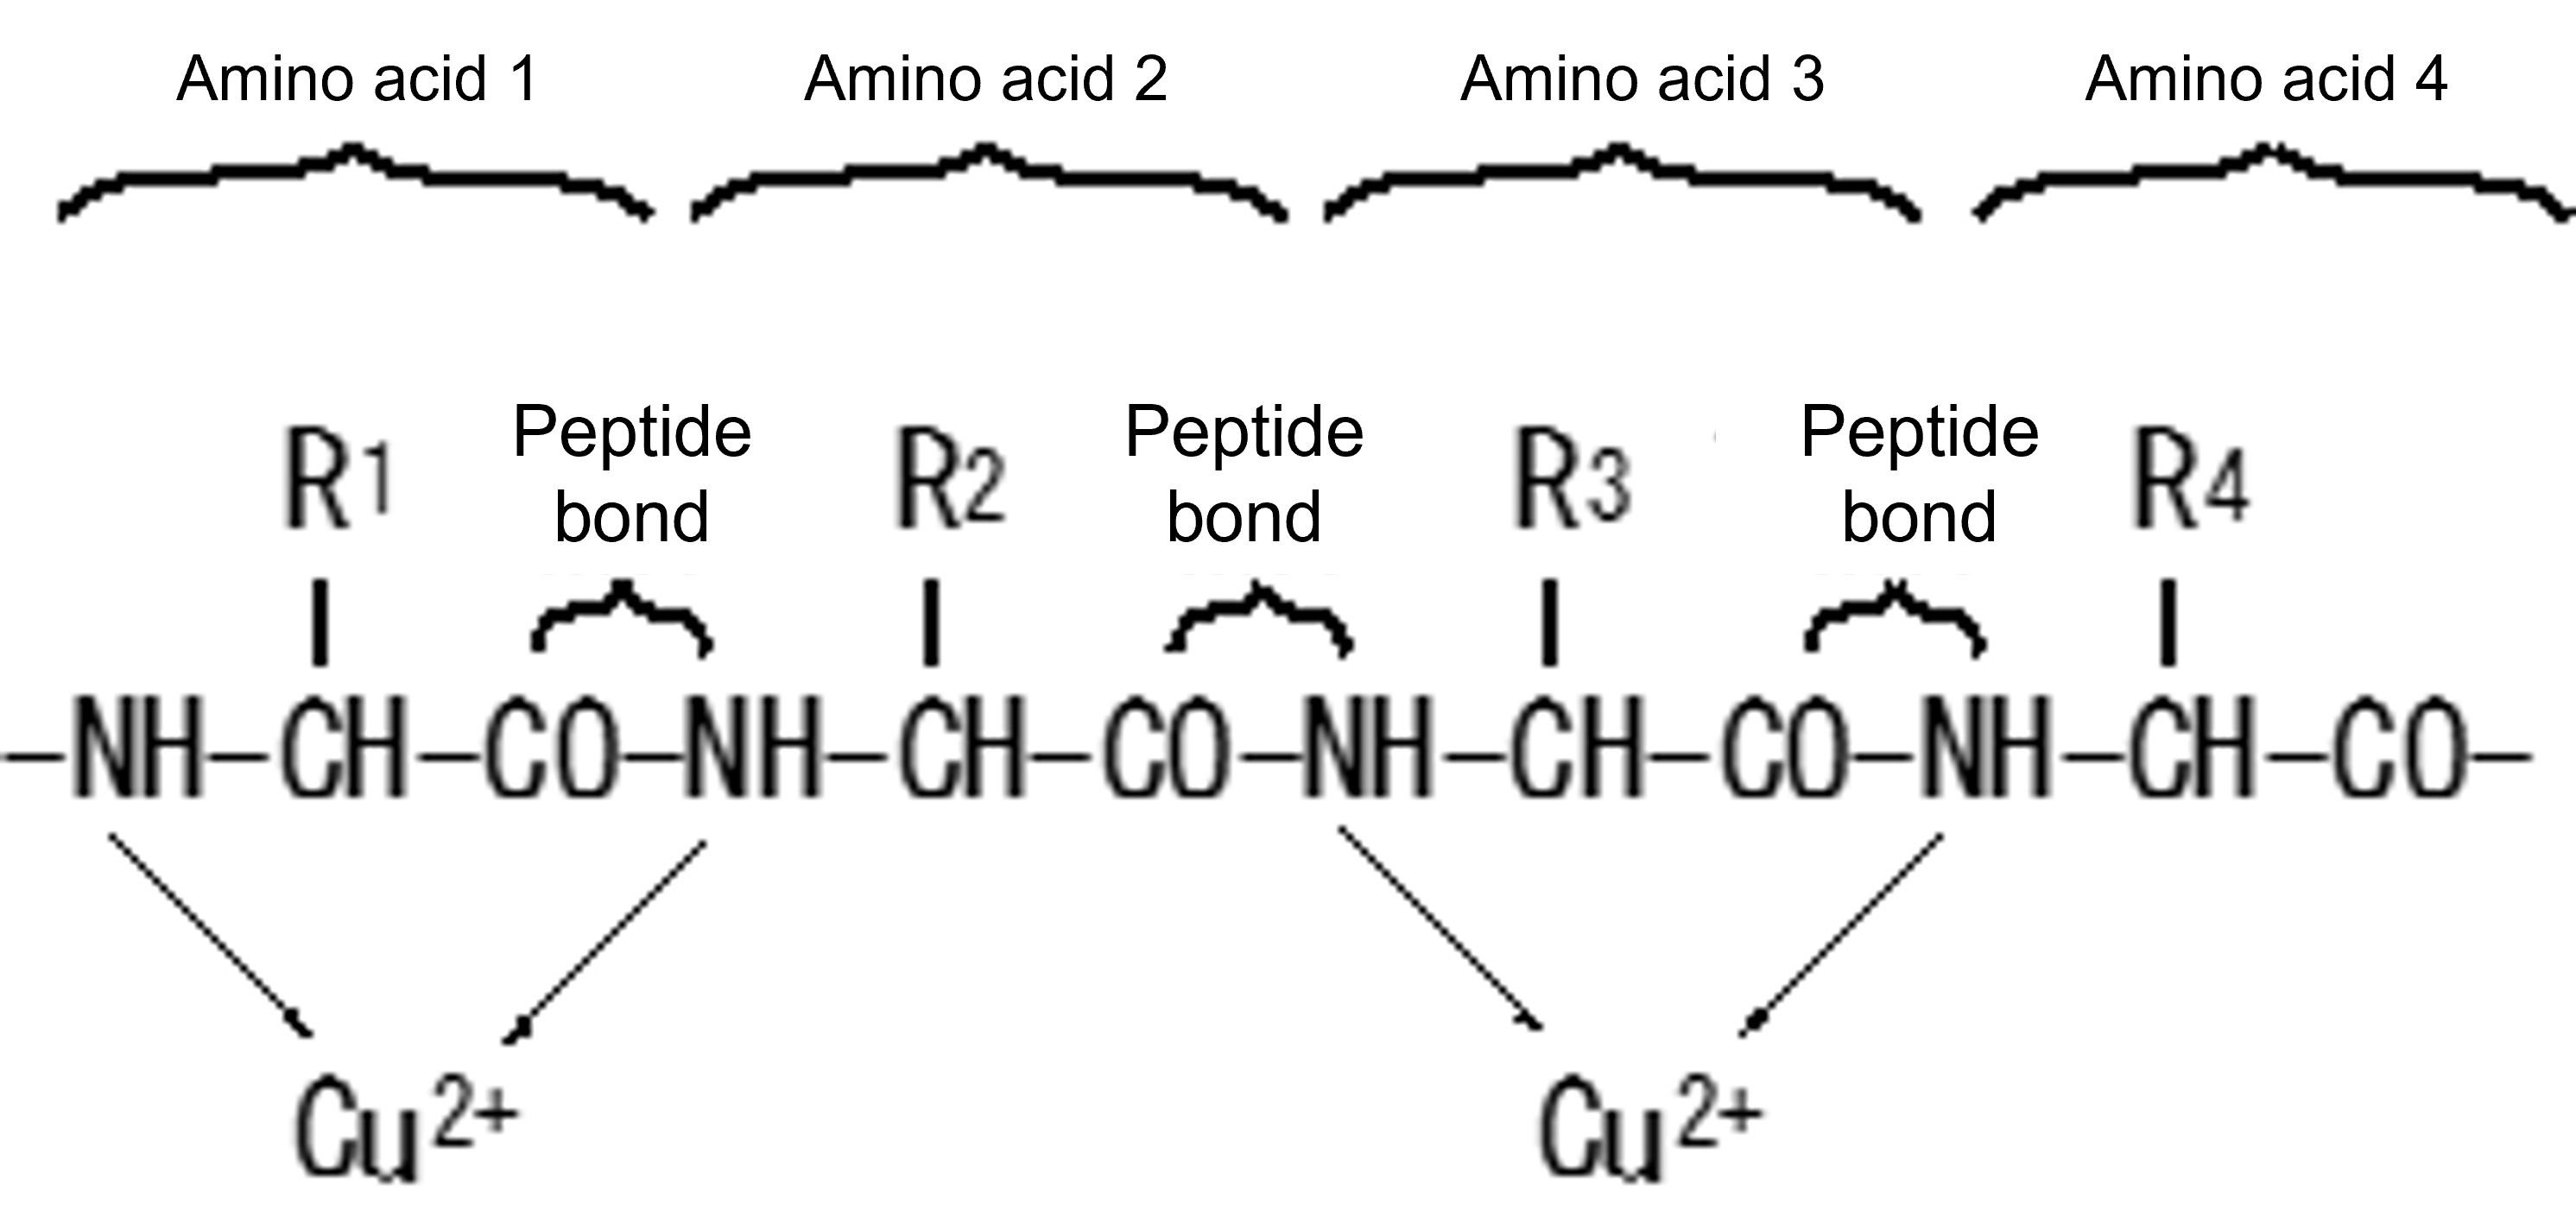
Figure 6 Principle of Color Development in the Biuret Method
Color development is not affected by the structure of R1 to R4
Although the biuret method is suitable for measuring protein concentrations as low as 0.5 to 5 mg/ml, the Lowry method is used for the concentration determination of more dilute protein solutions. In the Lowry method, in addition to chromogenic development based on the same principles as the biuret method, phosphomolybdic acid (a complex of phosphoric acid and molybdic acid) and phosphotungstic acid contained in phenolic reagents are reduced by amino acids with reducing properties such as tyrosine, tryptophan, and cysteine contained in proteins to form blue-blue pigments. Although the sensitivity is several tens of times higher than that of the biuret method, it is necessary to note that the color development rate varies depending on the type of protein because the content of reducing amino acids varies depending on the protein.
Biuret procedure
(1) Preparation of biuret reagent (Preparation of 100 mL in each group)
(a) Take 0.6 g of Potassium Sodium Tartrate (quadratic) into the package and transfer it to a 100 ml beaker. Wash off the solid adhering to the medicine wrapper with pure water from the washing bin into the beaker. Add pure water to make about 40 mL, and stir with a glass rod to dissolve.
(b) Add another 3 g of sodium hydroxide (deliquescence and handling precautions) and stir and dissolve.
(c) Take 0.15 g of copper sulfate (pentahydrate) and dissolve in about 40 mL of pure water in a separate beaker.
(d) Add the solution prepared in (c) to the beaker in (b) and stir (wash the beaker in (c) with a small amount of pure water and transfer all the washings to the beaker in (b)).
(e) Transfer to a volumetric flask and make up to 100 mL with pure water.
(f) Transfer to plastic containers for storage at room temperature
※ If the order of dissolution of the reagents is not followed, dissolution may be difficult or insolubilization may occur, resulting in failure.
(2) Colorimetric analysis
(a) Prepare a standard solution in which bovine serum albumin is dissolved in 20 mM sodium phosphate buffer solution (approximately 0.5 g of serum albumin is accurately weighed into a medicine wrapper and transferred to a 100 mL beaker. In addition, 4.0 mL of 0.5 M sodium phosphate (pH 7.0) and pure water are added and dissolved, and the volume is increased to 100 mL in a volumetric flask. The exact concentration is calculated).
(b) To each of the five tubes take 0, 0.2, 0.4, 0.6, and 1.0 mL of the standard solution using a mespipette or micropipette (1000 mL).
(c) In addition, add 1.0, 0.8, 0.6, 0.4, and 0 mL of 20 mM sodium phosphate (pH 7.0) (separately prepared by diluting 0.5 M solution in a volumetric flask) (each tube is a blank test, 5-, 2.5-, 1.667-, and 1-fold dilutions of the standard solution).
(d) Add 4.0 mL of biuret reagent to each tube with a volumetric pipette (use a safety pipette) and shake immediately and well.
(e) Allow to stand at room temperature for at least 30 minutes.
(f) Prepare a spectrophotometer (wavelength setting at 540nm, 0 and 100% transmittance calibration).
(g) Transfer the sample to a glass cell in order of decreasing color development, and measure the absorbance. (When changing the sample, wash the sample together.)
Using a Spectrophotometer (Video)
(h) A graph (calibration curve; Fig. 7) with absorbance on the vertical axis and albumin concentration (mg/mL) on the horizontal axis is prepared, and the slope of the line should be calculated (approximately 0.05). ※ If this calibration curve is prepared, the protein concentration of the unknown sample can be determined.(i) As a buffer, measure using 20 mM Tris-HCl (pH 7.5) and compare how the calibration curves differ.
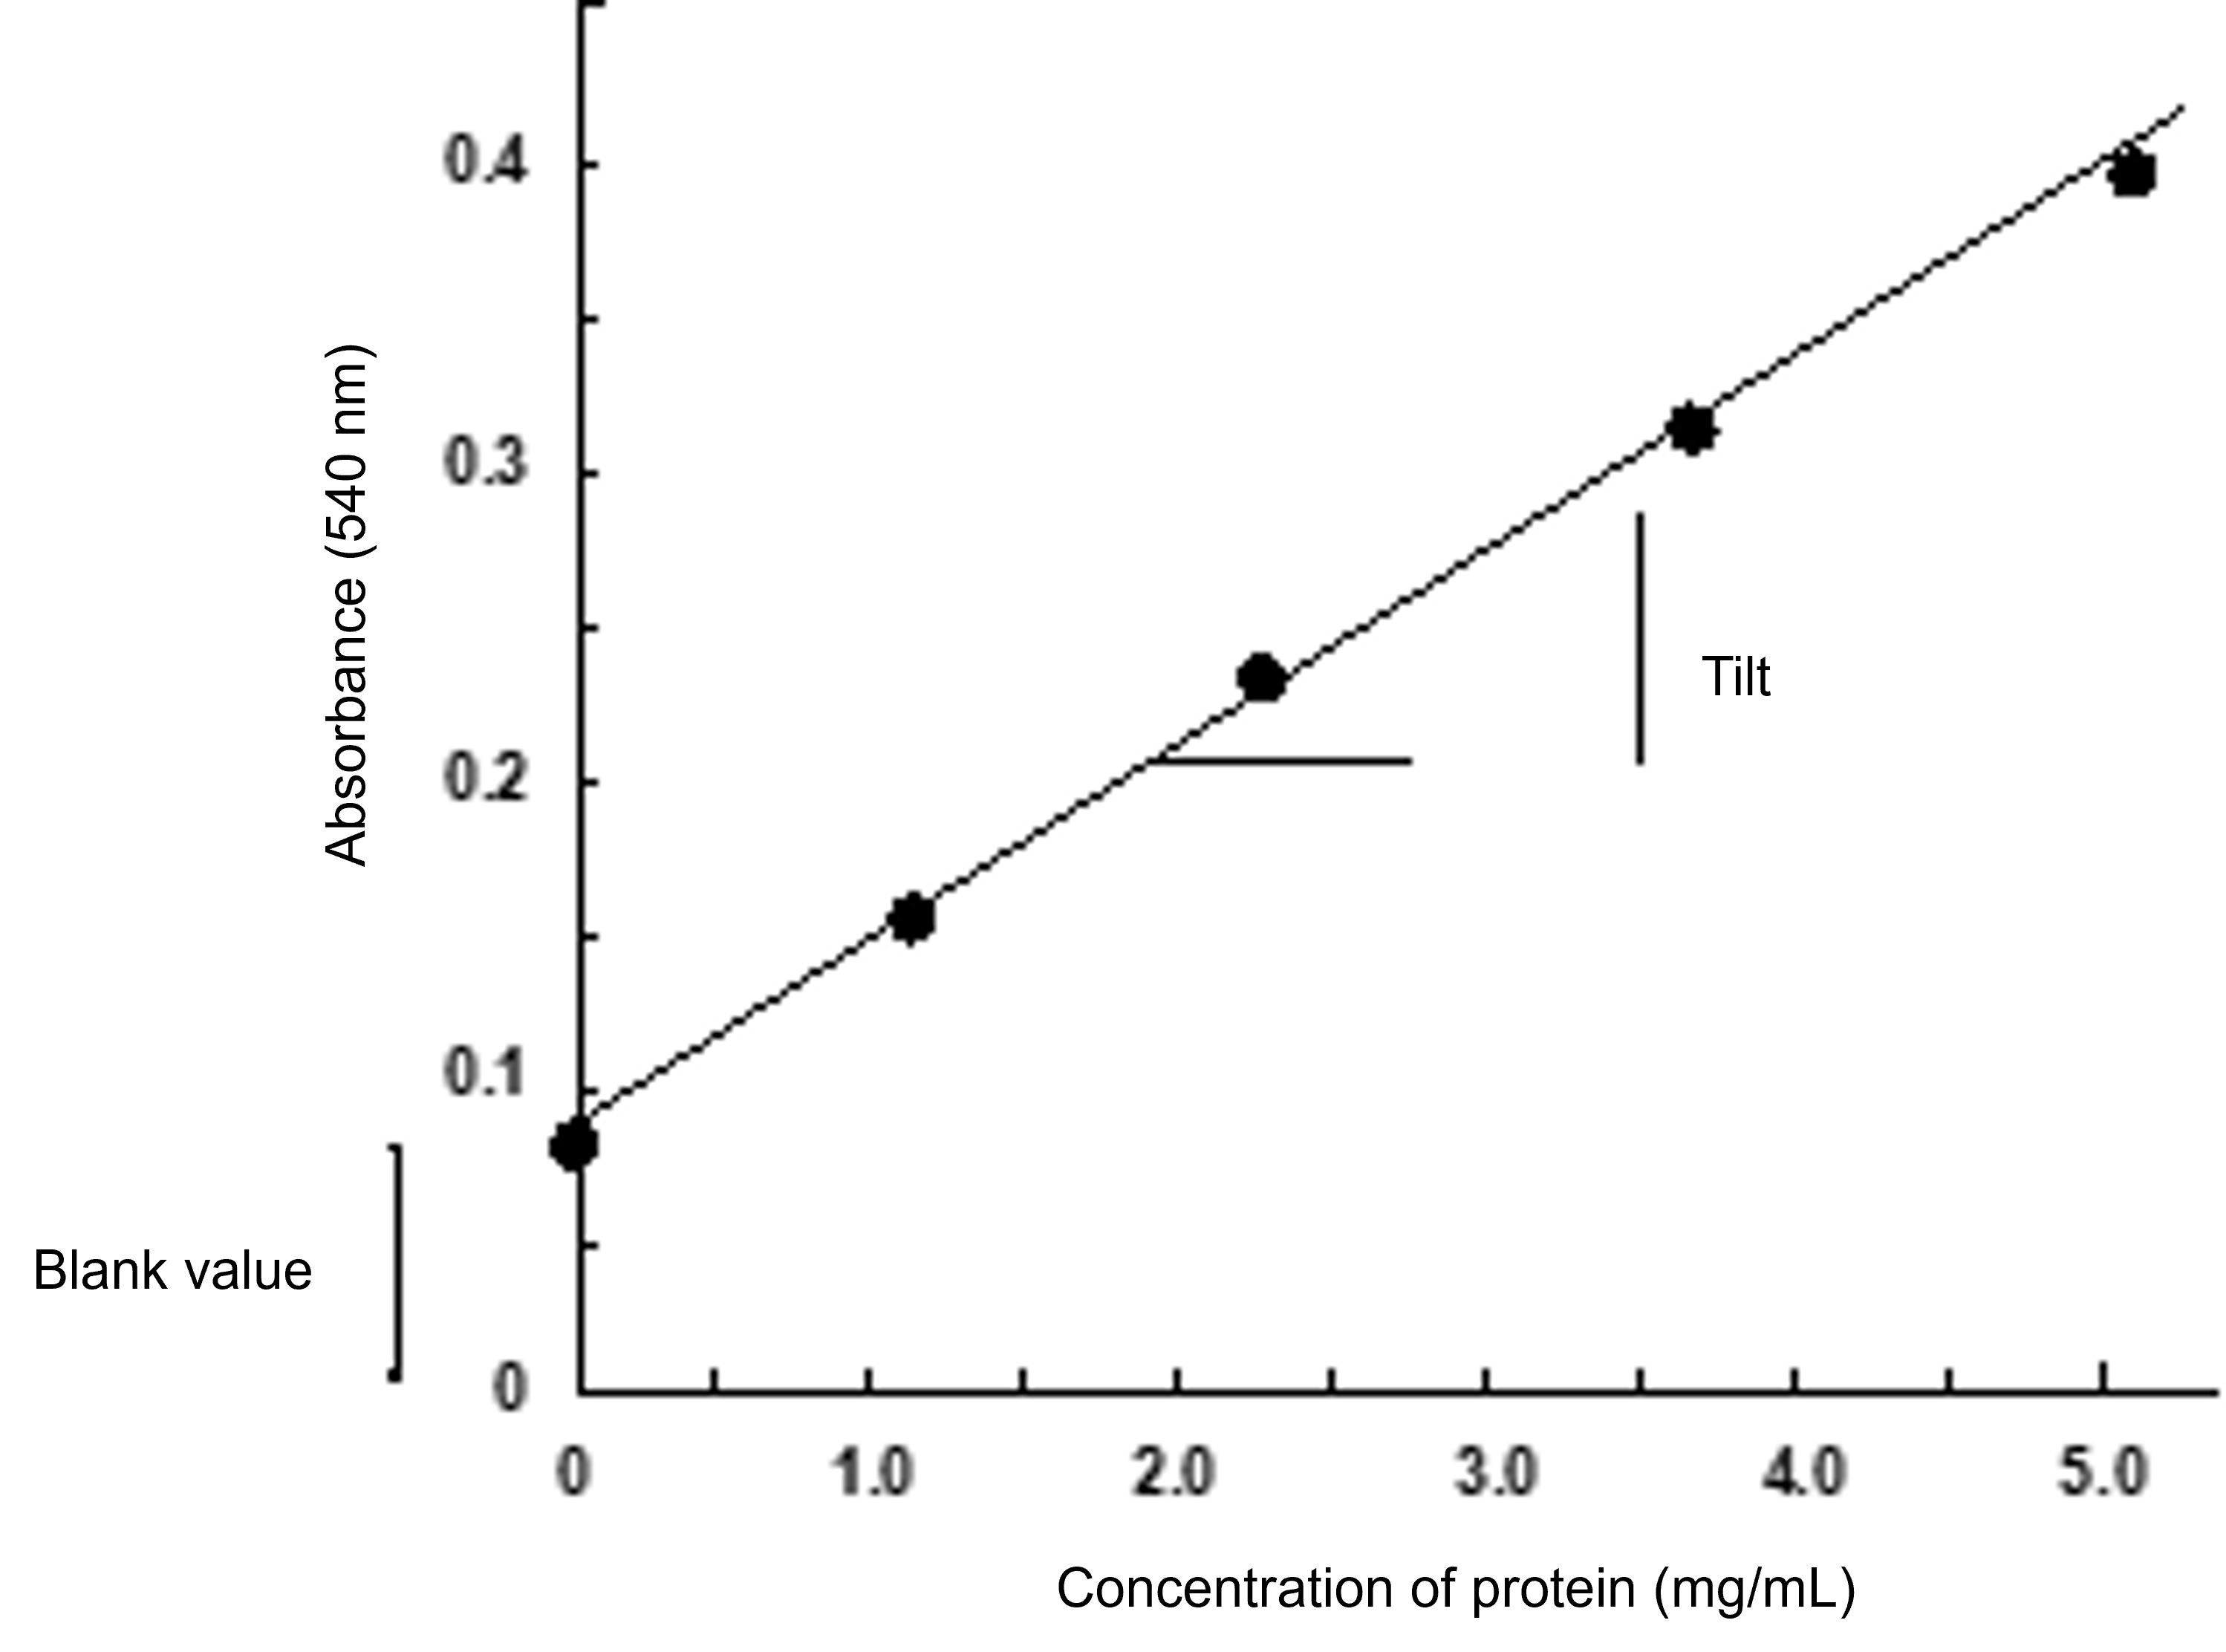
Figure 7 Calibration Curve for the Biuret Method
Lowry method
(1) Preparation of reagents
Reagents①2% Na 2 CO 3、0.1 M NaOH
Reagent ② 0.5% Copper Sulfate (Pentahydrate), 1% Potassium Sodium Tartrate (Tetrahydrate)
(To dissolve the required amount of copper sulfate and sodium potassium tartrate in pure water in separate containers and transfer them to a volumetric flask and mix them)
A mixture of the reagents ① and ② in a volume ratio of 50:1 on the day of the reagent ③ measurement
Phenolic reagents: Use commercially available products prepared by diluting them twice with pure water (we provide those that have been prepared)
(2) Colorimetric analysis
(a) Prepare a standard solution prepared by dissolving bovine serum albumin in 20 mM sodium phosphate (pH 7.0) to a concentration of 0.5 mg/ml (it is preferable to use a volumetric flask to dilute the standard solution prepared by the biuret method 10-fold with a buffer solution).
(b) To 5 tubes add 0, 0.2, 0.4, 0.6, and 1.0 mL of the standard solution.
(c) Add 1.0, 0.8, 0.6, 0.4, and 0 mL of 20 mM sodium phosphate (pH 7.0) to each tube.
(d) Add 5.0 ml of reagent ③ to each tube and stir well.
(e) Allow to stand at room temperature for at least 10 minutes.
(f) Add 0.5 ml of phenol reagent to each test tube and stir vigorously immediately.
(g) Allow to stand at room temperature for at least 30 minutes, and then measure the absorbance at 750 nm.
(h) Similar to the biuret method, prepare a calibration curve that describes the relationship between protein concentration and absorbance.
(i) Compare the results using 20 mM Tris-HCl (pH 7.5) as a buffer.
[Issue]
The slope of the calibration curve represents the sensitivity of the measurement (the larger the slope, the higher the sensitivity). Calculate the slope and calculate how much more sensitive the Lowry method is than the biuret method.