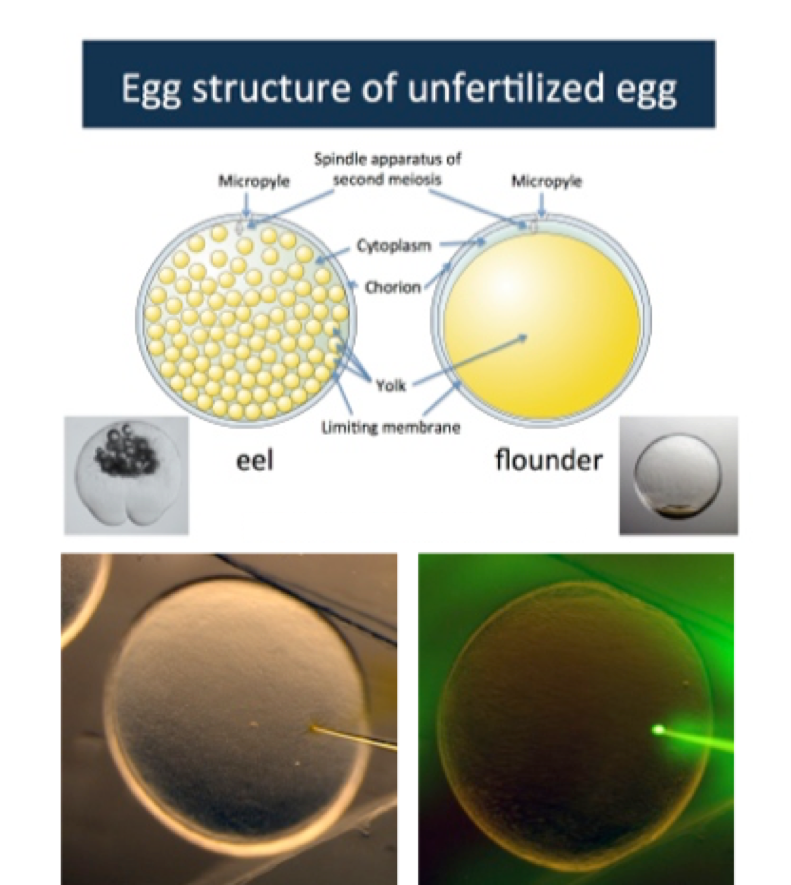
Section outline

    • Introduction to practical training conducted at Nanae Fishwater Station, Field Science Center for Northern Biosphere

    • ① The embryo is transparent and difficult to see inside. Always adjust the angle of the mirror to hold the best point.

      ② It should be handled cleanly because it is used by various people. When you have finished using the product, cover it.

      ③ Be careful not to scratch agarose Petri dishes when they are used. Grasp the distance between the tip of the needle and tweezers and the surface of the agarose.


    • ① It is expensive, so it should be used with care.

      ② Secure the screws securing the manipulator to the stand. When loose, the manipulator tilts to break the glass needle for injection.

      ③ The X-axis is caught, the Y-axis is set in the center, and the Z-axis is set in the middle before starting.

      ④ Check that the injector is sufficiently filled with oil before use. If you notice that the oil level is low after the experiment is over, add more oil as soon as possible.

      ⑤ Loosen the screw at the end of the injector holder after use. When tightened, the packing becomes weaker.

      ⑥ The injector holder must not be loosened from the manipulator.

      ⑦ After injection is complete, the needle should be removed as soon as possible and discarded in a prescribed can. If you leave it, you will be injured.


    • ① Overview

       This time, the eggs of goldfish and zebrafish which can remove the egg membrane are used. Because these eggs are floating in the egg cytoplasm, they can be placed in the cytoplasm of the embryo at any time during early development when the solution is injected into the egg. However, eggs that cannot remove egg membranes require new techniques, such as inserting needle tips from the hilum. In eggs with a single yolk bulb and a thin cytoplasm around it, the solution may have to be injected only into the thin cytoplasm. In this case, delicate injections must be made.

       The solution to be injected into the egg does not include calcium ions. This is because the influx of calcium may cause contraction of the cytoplasm. 0. 2M KCL, PBSs, etc. are used as the types of solutions used.

      ② FITC-dextran, biotin-dextran solutions (cell-labeled)

       Labeled cells are transplanted and injected with 5% FITC-dextran for external follow-up. After transplantation, 5% biotin-dextran-fixable solutions are injected into FITC-dextran solutions for histologic follow-up of the cells. When the transplanted embryo is fixed in Bouin's solution, the lysine on the dextran is cross-linked with the intracellular protein. Because the biotin is immobilized in the cells, an avitin that reacts with it can be used to colorize and locate the transplanted cells. Since these solutions have high viscosity, it is better to use a needle having a wide constriction portion.

      ③ mRNA solutions (PGCs-fluorescent)

       mRNA solutions are injected to impart fluorescent to PGCs. Since this solution is transparent, it is difficult to confirm the amount entered during injection. Therefore, when injecting a GFP-fluorescent mRNA, it is preferable to mix a little rhodamine into the solution. For dsRed fluorescence, mix FITC, but less should be used because of the strong fluorescence.

      ④ Solution injection procedure

      1. Centrifuge the test tube containing the solution to be injected and drop the dust down.

      2. Take a solution of about 3 μl with a pipette man p20 fitted with a gel-loader tip. This should be taken from the top of the solution.

      3. Under a stereomicroscope, place the tip of a narrowed glass needle on the side of the Petri dish and split the tip slightly.

      4. Insert the gel loader tip behind this glass needle and place the solution. At this time, when the remaining liquid is placed at the tip of the guerroader tip, pull the tip of the tip to the front side of the liquid contained in the needle, and then put it in.

      5. Attach the needle containing the liquid to the end of the injector holder. At this time, do not loosen the plastic part at the end of the holder too much. If it is loosened too much, the liquid entering the needle may go too far to the tip when this part is tightened to the metal part. Tighten the plastic part at the tip properly.

      6. Gently turn the knob on the injector body to move the solution to the tip.

      7. Attach a holder to the manipulator.

      8. Loosen the screw supporting the manipulator a little, rotate the manipulator, and apply the tip of the glass needle to the Petri dish containing the egg.

      9. Focus the stereomicroscope on the egg.

      10. Rotate the manipulator's xyz-axis knob to attach the tip of the needle to the egg.

      11. Check if the solution comes out of the tip of the needle. If there is a large amount, turn the injector knob slightly counterclockwise to reduce the amount. If not, turn the knob clockwise so that it flows out a little.

      12. Move the knob on the x-axis to pierce the needle into the egg. If it is difficult to pierce, push the tip of the needle into the egg by tapping the knob with a little finger.

      13. Put the solution until the amount of solution at the tip of the needle is about 1/10 the diameter of the egg.

      14. Move the knob on the x-axis and bring out the needle.

      15. Move the petri dish to move the tip of the needle to another egg. Repeat 12-14 to inject the solution.

      16. When changing the direction of the egg, the egg is moved using a manipulating needle.


    • ① The yolk plant hemisphere is removed to form an axonless embryo or to suppress the egg yolk movement of the goldfish. In the former case, resection should be terminated at 1-2 cell stage. Immediately after fertilization, the egg membrane is removed and begins as soon as the direction of the blastoderm is known. In the latter case, it can be done at any time after the 32-cell phase, but it is easier to do it after the MBT.

      ② Put the primary culture in an agarose petri dish (softer, about 0.8%) and line up the egg membrane-removed eggs.

      ③ Move the egg with the operating needle so that the animal and vegetable poles can be seen.

      ④ Lightly apply the glass wool of the surgical needle to the side of the egg and gently push it.

      ⑤ Then slowly press the glass wool down to the side of the agarose.

      ⑥ When glass wool is attached to the agarose surface, slowly and finely move glass wool in its axial direction.

      ⑦ Even if the yolk begins to break, continue moving it without stopping, and do not stop until it is finally severed.

      ⑧ Collect only the hemisphere on the animal pole side.


    • ① Prepare embryos at the blastula stage, surgical needles, and operating needles.

      ② Place one culture medium in an agarose petri dish and place the embryo to be operated on.

      ③ The yolk part of one embryo (donor) is held by an operating needle, and the blastoderm is cut along the latitude line with a surgical needle to form a blastoderm fragment (graft).

      ④ Similarly, while holding down the yolk portion, a cut is placed in the transplanted portion of the other embryo (host).

      ⑤ The donor embryonic cleavage site overlaps the host cleavage site. It is necessary to do it within one minute after it is first cut until it is piled up.

      ⑥ After 2-3 minutes, hold the donor and the cut surface of the host so that they stick to each other again.

      ⑦ After confirming that the grafted portion is bound, culture one by one in a 96-well culture plate filled with the primary culture medium containing antibiotics. At this time, the embryo or yolk fragment contained in the culture medium at the time of operation should not be placed in the well of the culture plate.

    • ① Prepare a needle for cell transplantation.

      ② Attach to the injector holder without putting anything in. Ensure that the mounting area is filled with mineral oil from the injector.

      ③ Rotate the injector knob clockwise to insert the mineral oil toward the needle tip and stop in front of the stenosis.

      ④ Draw the implant needle into the primary culture of the Petri dish used for implantation.

      ⑤ Turn the screw at the joint between the holder and the implant needle clockwise (in the closing direction), and then turn the needle tip of the implant needle upward.

      ⑥ Move the injector knob counter-clockwise to draw the primary culture into the implant needle.

      ⑦ Inhale and stop the primary culture to the middle of the implant needle.

      ⑧ Select the unfertilized egg and place it in the transplantation Petri dish, and insert the transplantation needle into the yolk portion.

      ⑨ Rotate the injector knob counter-clockwise and place the egg yolk in the needle (to the stenotic area) and coat the interior with egg yolk.

      ⑩ The primary culture is placed in and out of the implantation needle to wash out excess egg yolk. Remove unfertilized eggs.

      ⑪ Cell-labeled embryos (donor) and unlabeled embryos (host) are placed in transplanted Petri dishes.

      ⑫ Insert the implant needle into the labeled embryo's blastoderm. If it is inserted too deeply, YSL will be sucked in.

      ⑬ Turn the injector knob counterclockwise (slightly touching position) and draw deep cells (DC) into the implant needle. It is good that DC stops at the stenosis.

      ⑭ Pull the needle out of the donor embryo and insert it into the area of the host embryo to be implanted.

      ⑮ Turn the injector knob clockwise (slightly touching it) and slowly insert the DC in the implant needle into the host embryo.

      ⑯ The transplanted chimeric embryos are separated so that they do not mix with other embryos.

    •  The blastocoel of the cytoplasm-labeled spore embryo is excised with a surgical needle.

      ② Collect the blastocyst portion and place it in a 1.5 ml test tube filled with Ringer's solution.

      ③ When the blastula is submerged in the bottom of the test tube, remove the upper Ringer's solution.

      ④ Add Ringer's solution into the blastocyst, and remove the supernatant when the blastocyst is submerged.

      ⑤ This is repeated three times.

      ⑥ Remove Ringer's solution on the blastoderm as much as possible.

      ⑦ Ringer's solution containing 0.25% sodium citrate is added to the blastocyst, and the cells are dissociated with a yellow tip.

      ⑧ Centrifuge at 300 rpm for 1 minute to sediment the cells, and remove the supernatant.

      ⑨ Repeat steps 7-8 several times to remove cell debris.

      ⑩ Add about 200 μl of Ringer's solution of Ca2+ free to the precipitate of the cells, and suspend the cells with a yellow tip.

      ⑪ Centrifuge at 300 rpm for 1 minute to sediment the cells, and remove the supernatant.

      ⑫ Repeat steps 10-11 several times.

      ⑬ A cell suspension containing a slight Ca2+ free of Ringer's solution is placed in an implant needle without a stenosis.

      ⑭ Gently attach the needle to the injector holder.

      ⑮ Turn the injector knob clockwise to move the cell suspension to the needle tip. At this time, only the solvent moves first, and the cells collect and move toward the air side going from the rear. Bring the tip of the solvent to the needle tip.

      ⑯ The tip of the implantation needle is lowered into a petri dish for implantation, and the solvent (containing a small amount of cells) is extruded into the solution. Discard the fluid until the cell mass reaches the tip.

      ⑰ Once the cells have migrated to the tips, the needles are inserted into the host embryo and the cells are transplanted little by little.