섹션 개요

    • This section introduces the mud sampling procedure using a piston corer. Although there are some differences in the procedures depending on the equipment installed on each vessel, the piston corer is a large, heavy, and long instrument, so it must be handled with great care on board a vessel that is subject to turbulence. In addition, it is necessary to have a good understanding of how to prepare the coring equipment and how to process the collected samples in order to obtain high-quality samples and data. Therefore, we will explain each of the mud sampling operations using a piston corer in the following order: (1) preparation for observation, (2) feeding operation, (3) landing on the bottom, (4) lifting operation, (5) sample collection, (6) sample handling, and (7) recording observations and operations.

    • 1. Preparation for observation


       Connect the mud sampling tube to the main weight, and connect the mud sampling tube to the length of the core to be sampled. If an inner tube is used, insert it together here. Next, connect the piston to the end of the main wire that has been passed through the mud sampling tube. The piston is then pushed into the mud sampling pipe from the lower end, and a core catcher and core bit are attached to the end of the piston to complete the mud sampling section. Connect the main weight and main wire to the balance trigger. Insert a stopper pin into the balance trigger to prevent the trigger from coming off during operation.


       The sample taken by the piston corer is cut into 1 m pieces for easy processing and storage. To ensure that the position and orientation of the sample is correct during this process, mark the mud sampling tube and inner tube in advance. Figure 10 shows an example of marking on the inner tube. The direction of the arrow indicates the direction of the surface layer of the sample, and the section numbers are assigned in order from the deepest sample.


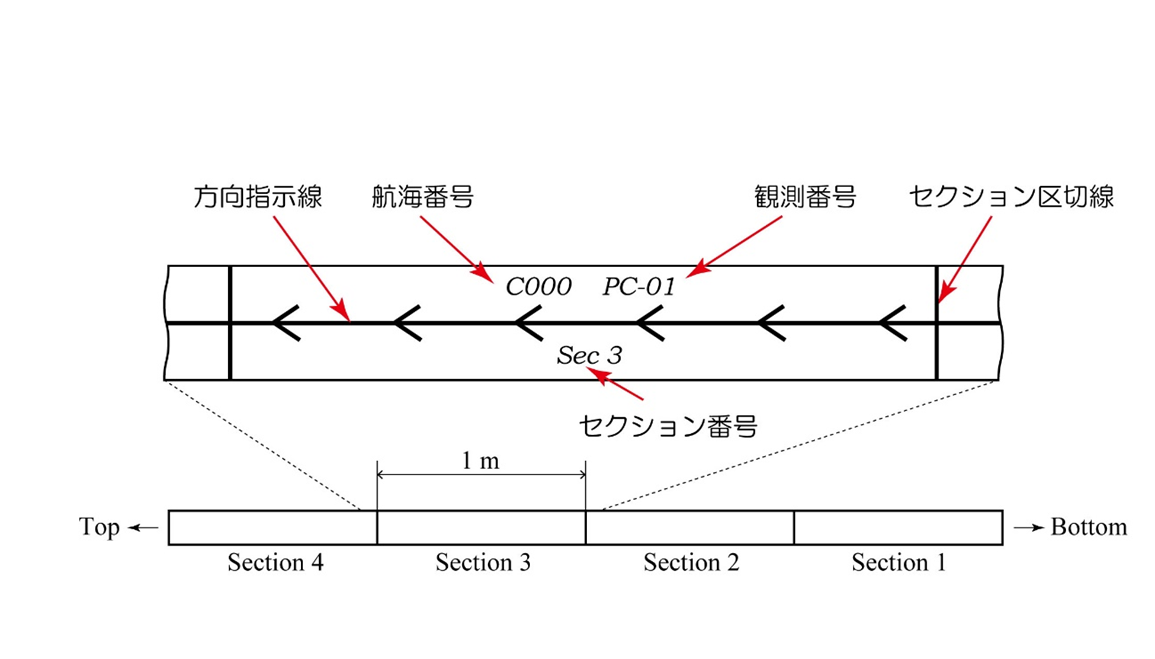
    • Fig. 10 Example of marking on inner tube

      方向指示線 Direction Line
      航海番号 Voyage Number
      セクション番号 Section Number
      観測番号 Observation Number
      セクション区切線 Section Separation Line

    • 2. Feeding operation

       Figure 11 shows the movement of the bottom sampler when it is placed from the stern of the vessel.

       First, the bottom sampler is lowered to the sea surface by swinging the crane. At first, a wire rope connected to the side of the main weight (Figure 11-a) is used to lift the bottom sampler while it is lying down. The winch wire (Fig. 11-b) is then wound up to gradually raise the mud sampler, and when it is completely lifted, the bottom sampler stands upright. Figure 12 shows how the bottom sampler is lifted in actual operation.

       Next, a pilot weight is suspended from the arm of the balance trigger. After the stopper pin of the balance trigger is pulled out, the winch wire is immediately released and the bottom sampler is put into the sea. If the balance trigger makes contact with the hull of the vessel, the bottom sampler may fall in mid-air, resulting in a serious accident. To prevent the bottom sampler and balance from swinging in the air due to the ship's motion, we use a rope to hold the bottom sampler down until it is just about ready to be placed in the water. Once the bottom sampler has been lowered to a depth of 50 m, the winch is stopped and a pinger*1 is attached to the winch wire. The winch wire is then unloaded and the bottom sampler is lowered to the seafloor.

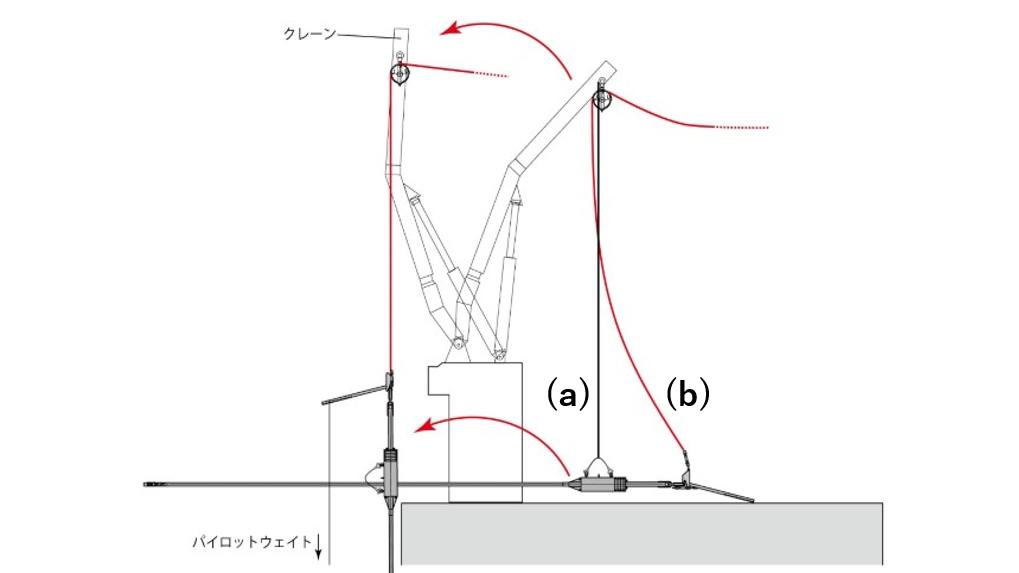
    • Fig.11 Loading operation of bottom sampler (1)

      クレーン Cranes
      パイロットウェイト Pilot weight


    • Fig.12 Loading operation of bottom sampler (2)

      寝かせた状態から From a lying position

      だんだんと立ち上がり Gradually stand up

      垂直に吊り下げられる Suspended vertically

    • 3. Landing on the bottom

       Once the bottom sampler is in the water, follow the procedure shown in Figure 13. The wire is unrolled at a speed of 1 m/sec while checking the underwater altitude of the bottom sampler (distance to the seafloor), relying on the depth of the water, the length of the unrolled wire, and the pinger signal (Figure 13-①). When the bottom sampler reaches a height of 50 m above the seafloor, it stops unloading and waits for 3 minutes to stabilize its position (Figure 13-2). After waiting, the wire is restarted at a slow speed (0.3 m/second) (Figure 13-3). As soon as the balance trigger is activated and the bottom sampler begins to descend to the seafloor, the wire feed is immediately stopped (Figure 13-4). When the tension meter*2 detects a decrease in the tension applied to the wire, it is determined that the trigger has been activated. Within a short time after the trigger is activated, the mud sampling tube pierces the seafloor and the mud sampling section stops falling, so the wire starts unwinding without a pause (Figure 13-⑤). Since there is a risk of excessive tension due to frictional forces generated when pulling out the mud pipe, the winding speed should be slow (0.3 m/second) until the bottom is released (Figure 13-6). As the wire is wound up, the tension gradually increases, and when a constant tension is observed, bottom sampler release can be confirmed. The winding speed is then increased and the bottom sampler is quickly recovered on board (Figure 13-7).

    • 7

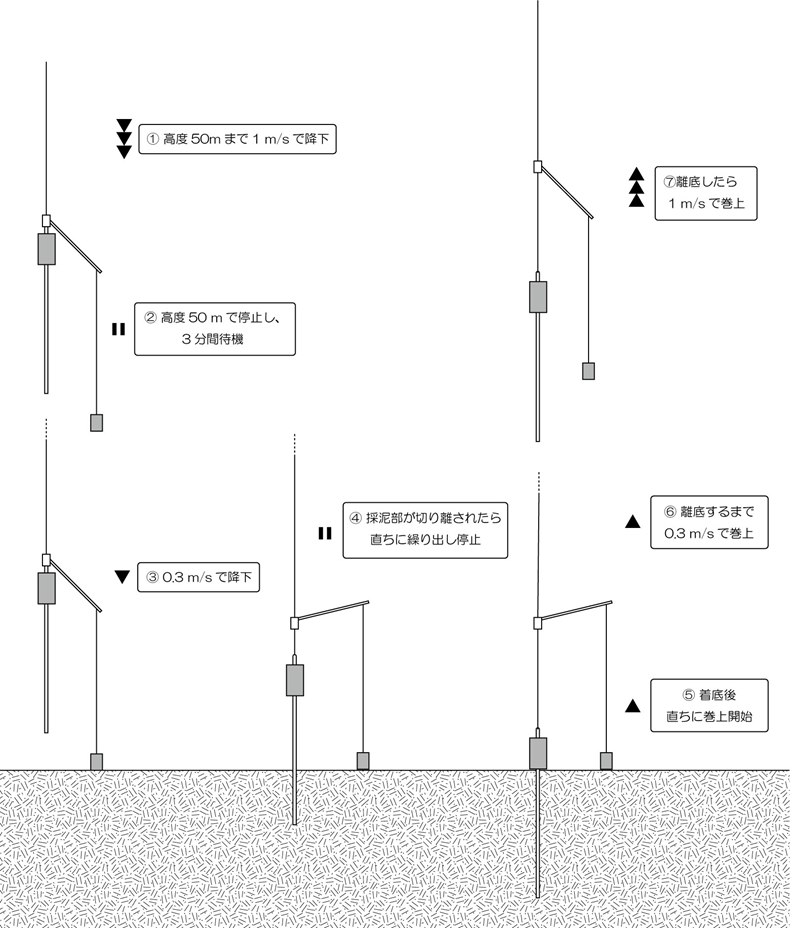
      Fig. 13 Winch operation at piston corer landing

      1 高度50mまで1m/sで降下 Descend at 1 m/s to an altitude of 50 m
      2 高度50mで停止し、3分間待機 Stop at 50m altitude and wait for 3 minutes
      3 0.3m/sで降下 Descend at 0.3 m/s
      4 採泥器が切り離されたら直ちに繰り出し停止 Stop unloading as soon as the bottom sampler is detached
      5 着底後直ちに巻き上げ開始 Starts hoisting immediately after landing
      6 離陸するまで0.3m/sで巻上 Starts winding up at 0.3m/s until takeoff
      7 離底したら1m/sで巻上 After the vessel leaves the bottom, it winds up at 1m/s.

    • If the bottom sampler is tilted at the time of landing, it cannot be penetrated deeply. Also, if the bottom sampler is subjected to oblique force when it is pulled out, the mud sampling pipe will be bent and damaged. Therefore, it is necessary to keep the bottom sampler right under the ship not only while lowering it, but also from the time it reaches the bottom until it leaves the bottom, taking into consideration the current and other factors to keep the wire pointing straight down.


      1 Pinger

       An acoustic device that emits sound signals at regular intervals and is used to measure seafloor altitude (the distance from the seafloor to the pinger). By using this device to measure the distance between the bottom sampler and the seafloor, it is possible to safely and reliably conduct mud sampling.

      Link: Pinger


      2 Tension meter

       This device measures the tension (weight) applied to the wire. By measuring the increase or decrease of the tension, it is possible to know when the bottom sampler leaves or arrives at the seabed.

    • 4. Lifting operation

       The lifting of the bottom sampler is almost the same as that of the feeding operation, but in the reverse order. However, the difference is that the distance between the balance trigger and the bottom sampler is far from each other. Since it is difficult to lift the balance trigger and the mud sampler together, the pilot weight and the balance trigger are usually removed first, and then the bottom sampler is lifted.

       The bottom sampler may swing greatly when it is lifted into the air due to the impact of waves on the bottom sampler or due to the ship's motion. Therefore, as when putting in the bottom sampler, the work is performed while holding it down firmly with a rope. If the bottom sampler is struck by the ship's hull, it may result in damage to the bottom sampler or loss of valuable samples.

    • 5. Sample Collection


       Once the bottom sampler has been lifted, the sample (core) is cut apart at the joints of the sampling pipe (Figure 14). Remove the core bit and core catcher from the end of the mud sampling pipe. At the joints of the sampling pipe, slide the connecting sleeve and cut the sediment at the joints using a piano wire or nylon texs to separate the entire sampling pipe. The cut surface is then sealed with plastic sheeting or tape to prevent leakage or contamination of the sample. To prevent orientation and position from being lost after separation, mark the outside of the pipe according to the method shown in Figure 10. In the case of mud sampling using an inner tube, use a cutter to cut the inner tube at the pre-marked section-by-section line while pulling the inner tube out of the sampling pipe.


      Translated with DeepL


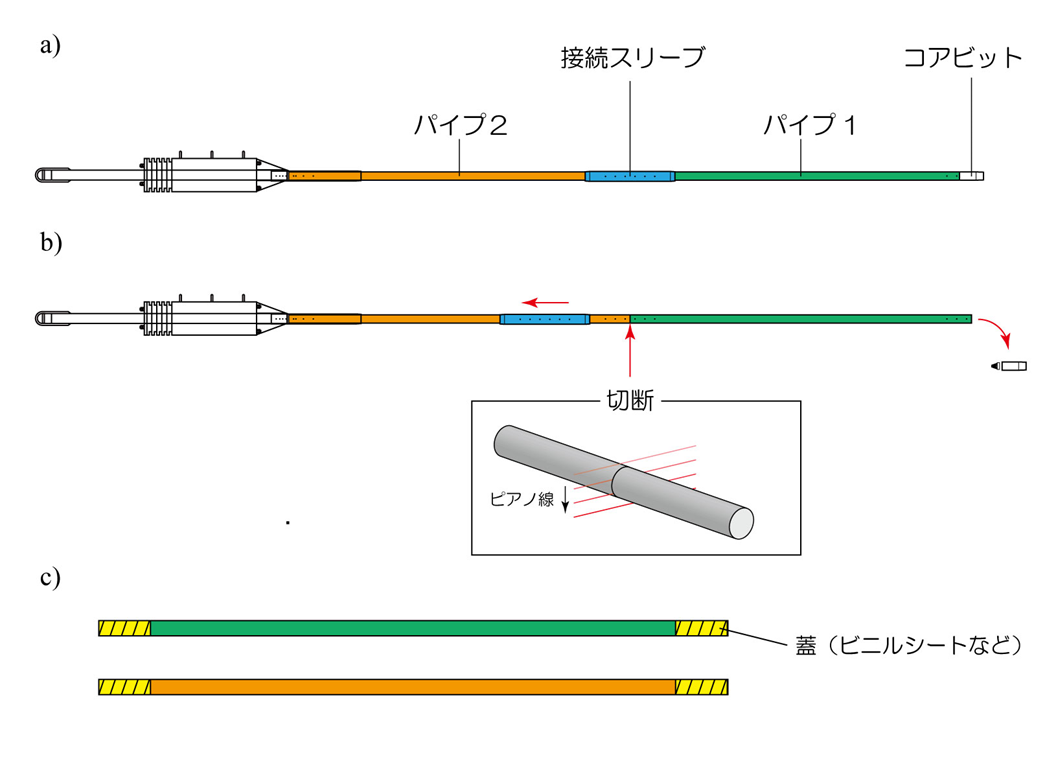
    • Fig. 14 Sample recovery

      a) Condition at the time of lifting b) Cutting off the pipe c) Sealing the pipe

      接続スリーブ Connecting Sleeves

      コアビット Core Bits

      パイプ Pipe

      切断 Cutting

      ピアノ線 Piano wire

      蓋(ビニルシートなど) Lid (e.g., vinyl sheet)

    • 6. Sample Processing

       The collected cores are further cut into 1 m lengths of pipe for easier handling. The core is then cut into semicircles to observe the thin layer of lamina found in the core and to further distribute the sample into smaller pieces (Figure 15). This operation is called the "core splitting process.

       Figure 16 illustrates the semi-circular sectioning process. First, the core is pushed out of the pipe and transferred to a PVC pipe. A hydraulic extruder is used to slowly extrude the core under constant pressure. After transferring the core into the PVC pipe, the core is further cut into two semi-cylinders. One half of the split core is called the working half and the other half is called the archival half.

       Since the seafloor core is a very valuable sample that contains information tens of thousands of years old, there is an international rule that samples for analysis are taken from the working half and the archive half is kept in cold storage as a semi-permanent sample for preservation. In Japan, the Kochi Core Center, a research facility jointly operated by Kochi University and the Japan Agency for Marine-Earth Science and Technology (JAMSTEC), serves as an integrated center for the storage and management of core samples collected in Japan and overseas, and for research using these samples.

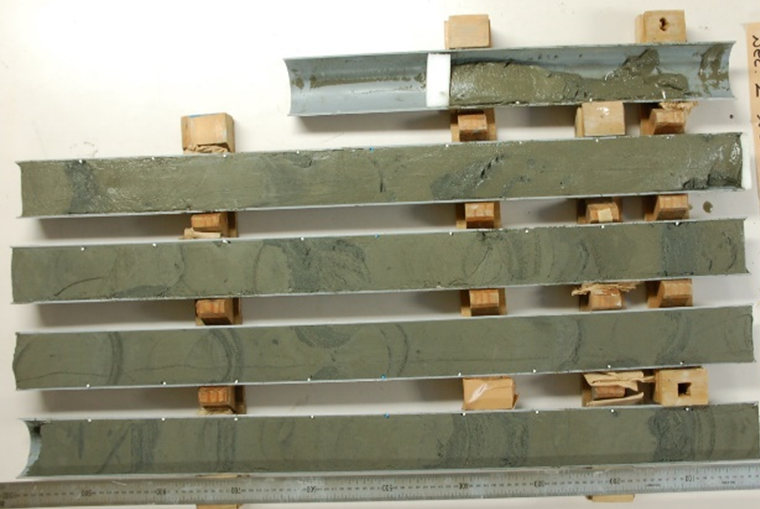
    • Fig. 15 Semi-split sediment core


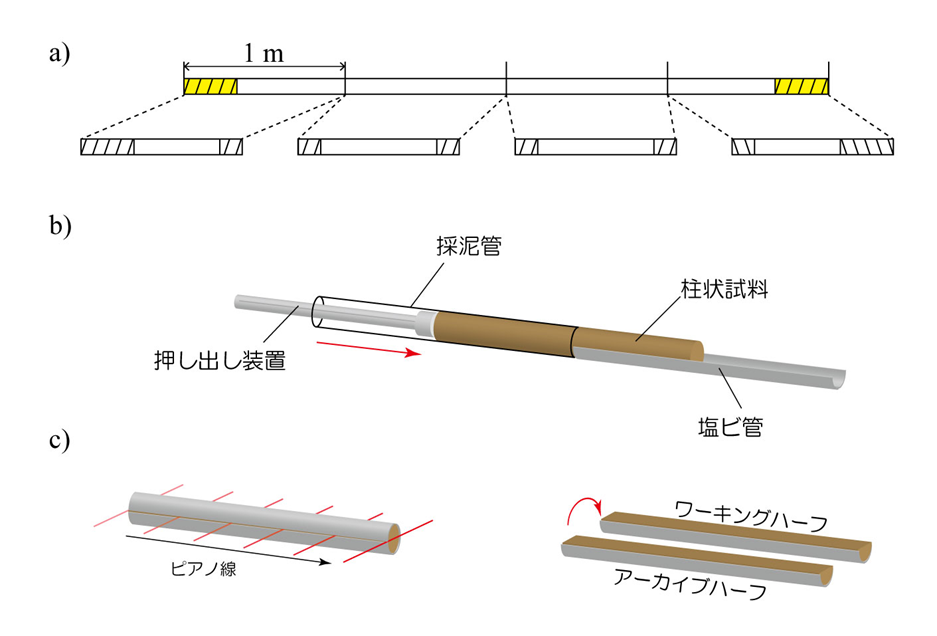
    • Figure 16. Half-splitting a core

      a) Cutting the pipe b) Extruding the core c) Splitting the core in half

      押し出し装置 Extruder

      採泥管 Mud sampling tube

      柱状試料 Pillar sample

      塩ビ管 Vinyl chloride pipe

      ピアノ線 Piano wire

      アーカイブハーフ Archival half

      ワーキングハーフ Working half

    • 7. Observation records

       In mud sampling as well as CTD observation, it is the most basic data and important information for research and survey to record the length of wire unrolled, outline of the sample taken, sample distribution, and destination, in addition to geographical information such as vessel level and water depth at the time of sample collection. Therefore, not a few institutions prepare observation field notebooks that specialize in recording the work done during mud sampling. It is also important to record the specifications of the bottom sampler, such as the weight of the main weight used and the length of the sampling pipe, as well as the length of the sample collected by the bottom sampler, as indicators for the next observation.